Have you decided to launch your WordPress site? However, don’t you know where to start?
If you are looking for an easy-to-follow WordPress installation guide, this tutorial is for you.
In this tutorial, I will show how you can easily install WordPress on any hosting service, such as Bluehost, Dreamhost, HostGator, etc.
I’ll talk about two different ways to install WordPress in this WordPress installation tutorial.
1. Using Bluehost to install WordPress
2. Using FTP to install WordPress, also known as manual WordPress installation
For the first part, I’m going to use Bluehost. You can pick any other hosting service, though.
I suggest Bluehost because not only is it widely used (over 2 million domains are being hosted), but it comes with an affordable price tag of just $3.95 per month. Along with that, you will get a free domain name for one year. So what else do you want?
Click here to sign up for Bluehost
Now, let’fs talk about installing WordPress on any hosting.
What are the things you need for WordPress Installation?
- Domain Name
- Reliable Hosting Service
- A good-looking professional theme (optional)
Installing WordPress Using Bluehost
Did you know that you can install WordPress on Bluehost and set up your WordPress site in under just 5 minutes?
Using Bluehost to install WordPress is simple and easy. Even if you are a beginner, you can follow the following steps to start your WordPress site.
Quick Note: I assume you already bought hosting and domain with Bluehost, so I’ll directly get into the details on how to use Bluehost to install WordPress.
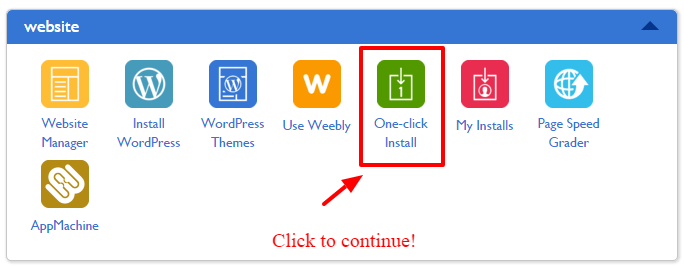
Step 1: Once logged into your Bluehost hosting control panel (cPanel), scroll down to find the “website” section. Click on “One Click Install” to continue. See the screenshot mentioned below.
Step 2: Now, click on the WordPress option under the “Blogs & Website Builders” tab.

Step 3: After you click on the “I’ve read the terms & conditions“, Bluehost will start the WordPress installation, and within seconds, it will ask you to pick the domain where you want to install WordPress.
Step 4: Log into your WordPress dashboard

Once you choose the domain where you want to install WordPress, it will continue the WordPress installation process.
Within a few seconds, you will get all the information like your website URL, website control panel URL, along with your WordPress admin username and password.
That’s it! You have successfully installed WordPress on Bluehost in under 5 minutes in four simple steps.
Now, you can visit YourWebsiteDomain.com/wp-admin (replace YourWebsiteDomain with your site domain name) by entering the login details you have.
Now, let’s talk about how you can install WordPress manually; in other words, I’ll discuss how to install WordPress on FTP.
How to Install WordPress Manually?
Manual WordPress installation is still one of the most preferred ways to install WordPress. It’s also known as a “5-minute install.”
What do you need for Manual WordPress Installation?
- WordPress (you can download it for free)
- FTP client (File Transfer Protocol)
- Access to your hosting control panel (cPanel)
Before installing WordPress manually via FTP, you need to have access to your own domain name and web hosting. I personally suggest Bluehost (as mentioned above); you can pick anything like HostGator, JustHost, etc.
To start using FileZilla, here are a few simple steps you should follow.
1. Download and install FileZilla from here (it’s free and widely used).
2. Open FileZilla and enter your domain name, username, and password
Now, let us talk about the WordPress manual installation via FTP.
Step 1: Download the latest version of WordPress from here.
Step 2: Unzip the WordPress file you just have downloaded from the WordPress site and upload the files to your web host directory using an FTP client such as FileZilla.
A quick tip: If you don’t know how to use an FTP client to upload files, I suggest you check out this link. It will help you quickly understand how to upload any file using FTP.
Step 3: Upload your WordPress files to your website’s root directory (it looks something like /public_html/) if you want to install WordPress on your root domain like YourWebsiteURL.com
Step 4: Once you have successfully uploaded all your WordPress files, go to your web hosting control panel (cPanel) to create a database.

Step 5: Once you click “MySQL Databases” to create a database, it will ask you to enter a username and password. Simply provide them and click on the “Create A User” button to continue.

Step 6: Now that your database is ready, you can install WordPress. Enter the URL where you uploaded WordPress files using FileZilla (FTP client). Select your preferred language to continue.
Step 7: In the form shown by WordPress, you will have to enter your database name and password you created earlier.
Step 8: In this final step, by clicking on the “Run the Install” button, you will set up your WordPress installation. The next steps are plain simple you need to enter your site name, username, and password.

So that’s it! Use your login credentials, such as password and admin username, to login to your WordPress dashboard.
How To Install WordPress On Other Hosting Services?
I hope you understand how to install WordPress through the BlueHost hosting service.
If you have chosen other well-known hosting companies like SiteGround or InMotion Hosting, you must look for the auto-installer script, Softaculous, or WordPress under the “Auto Installers” section of the control panel.
Look at the screenshot below for a better understanding!

You may click Softaculous or WordPress and select the domain name to set up WordPress.
HostGator and a few other hosting services use the auto-installer QuickInstall for the WordPress setup process to finish in 5 minutes.
Step 1: Go to the HostGator control panel and look for the Software/Services section; click “QuickInstall”.

Step 2: Now, you can see the WordPress option under “Blog Software” to launch the WordPress installer.
Step 3: Look at the left menu. Under Popular Installs, Click WordPress > Install WordPress.
Final Thoughts on WordPress Installation Guide
Setting up a WordPress blog was a BIG deal a few years ago. But now, with the latest technologies like “one-click install,” Mojo marketing place, etc., it has become extremely easy to start your WordPress site.
Even if you are a beginner without tech skills, you can easily install WordPress on any hosting service using this simple tutorial.
But if you are confused or not sure about installing WordPress all by yourself, you can get in touch with me. If you buy the hosting from us, we’ll do the WordPress installation free of cost! Let me know what you think about the WordPress installation. Do you have any questions?