Are you using Rapyd Cloud hosting and want to manage your priceless files securely? If yes, you’ll eventually need to learn about the SFTP (Secure File Transfer Protocol) login and its uses.
Recently, I have started using this high-availability hosting as it offers a scalable solution for developers like me. While deploying the websites, I always prefer managing a backend service and file uploading through SFTP for high-security data transfer.
In this easy tutorial, I’ll teach you how to create an SFTP login for Rapyd Cloud hosting and connect with your favourite FTP client like FileZilla. Let’s dive in!
Disclosure: We get a commission when you buy a product via our affiliate link at no additional cost.
Table Of Contents
- What is SFTP?
- Why Use SFTP with Rapyd Cloud Hosting?
- Step-By-Step Guidelines To Create Rapyd Cloud SFTP Login
- Step 1: Log in to Rapyd Cloud
- Step 2: Navigate to Your Hosting Project
- Step 3: Click File Access
- Step 4: Create Key Pair
- Step 6: Creating Public & Private Keys
- Step 7: Use FileZilla Software
- Step 8: Enter Your Private Key
- Step 9: Connect For Secure File Access
- Wrapping Up – Installing SFTP server in Rapyd Cloud Hosting
What is SFTP?
SFTP stands for Secure File Transfer Protocol, which is nothing but a secure file transfer method between your local machine and your web server. Unlike FTP, SFTP encrypts your session to protect your data from intruders.
I have explained a detailed guide on creating the SFTP login for Cloudways hosting, where I discussed the in-depth matters of this safest file moving method and its advantages. If you are new to server management, this procedure might sound technical, but it is a simple process in Rapyd Cloud hosting.
Why Use SFTP with Rapyd Cloud Hosting?
Rapyd Cloud hosting provides a reliable and scalable cloud infrastructure for developers and high-traffic business websites. Using SFTP for Rapyd Cloud ensures:
- Encrypted data transfer
- Easy file management
- Secure user authentication
- Streamlined deployment workflows
Step-By-Step Guidelines To Create Rapyd Cloud SFTP Login
Step 1: Log in to Rapyd Cloud
- Visit cloud.rapyd.net
- Enter your credentials and sign in to your Rapyd Cloud hosting dashboard.
Select the specific project or server you want to set up the SFTP access for.

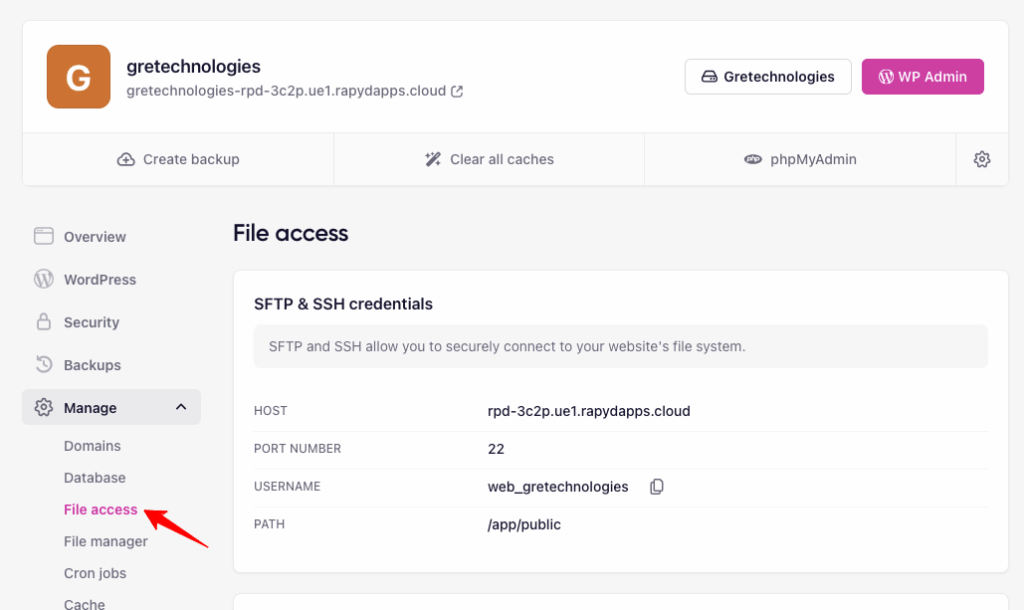
Step 3: Click File Access
On the left settings, under the “Manage” tab, click the option “File Access”
Step 4: Create Key Pair
Now, you will get the option “Create Key Pair” to produce the keys for the safest file moving process.

A pop-up will open, and there you need to name the key. After that, click the “Create” button.

Step 6: Creating Public & Private Keys
The “Create” button will generate two keys – Public and Private
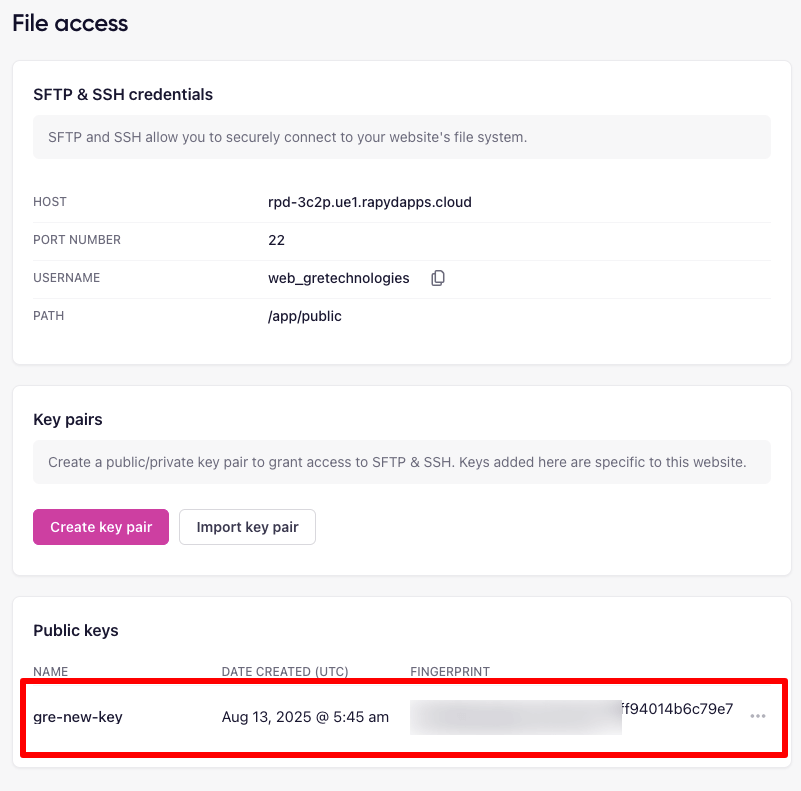
You should understand that the Public key is stored in the server, and the Private key will be downloaded into your computer. Keep the private key safe, as we need it to connect to the SFTP server in FileZilla software.
Look at the image below! The private key is in the “Download” section of your computer.

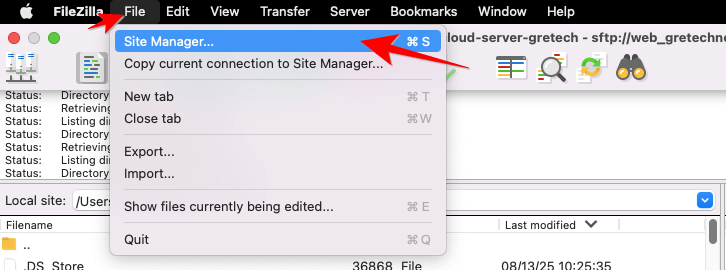
Step 7: Use FileZilla Software
Now, let’s open the FileZilla software and click the “File” option at the top. Choose “Site Manager” as shown in the following image.
Step 8: Enter Your Private Key
A pop-up will be opened; Click “New Site”, name the server, and enter the required details. Refer to the image below.

For the “Browse” option, make sure that you are selecting the right path. I have provided the screenshot for your easy understanding. Check below.

Step 9: Connect For Secure File Access
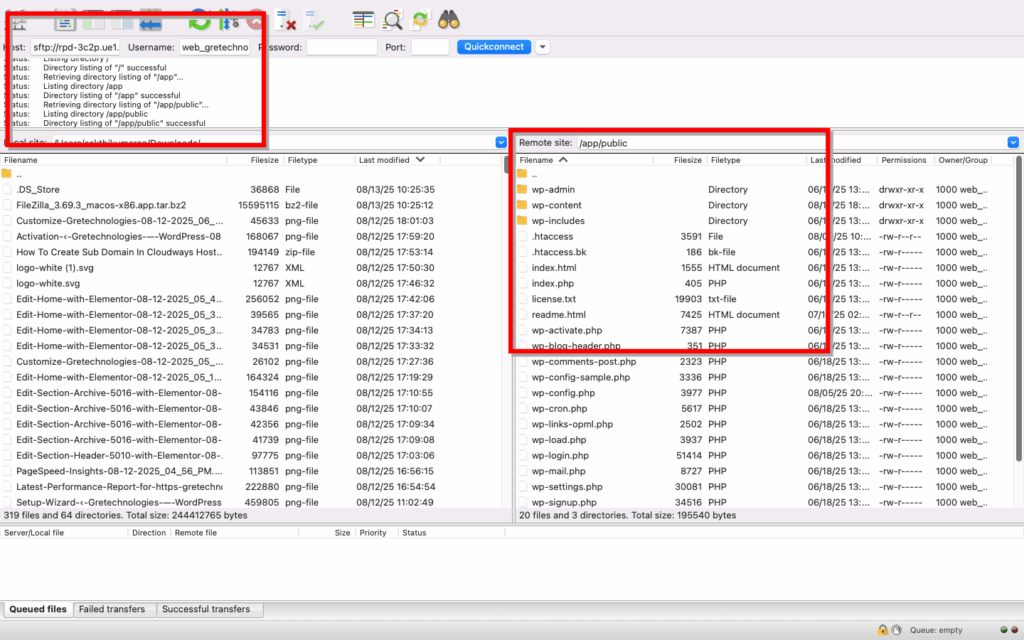
After choosing the correct file, click the “Connect” button. Now, your site is successfully connected for the file handling tasks.
Wrapping Up – Installing SFTP server in Rapyd Cloud Hosting
Undoubtedly, the SFTP login access is a must-use feature for developers. If you are deploying your first website or managing a high-traffic application, it provides a reliable way to manage your files. I always utilize this safest access to navigate directories, upload site files, change file permissions, and download backups.
You may also use this login to access your website files from the local machine, like adding or removing WordPress plugins and changing the theme design. I hope you understand how to create the SFTP login access in Rapyd Cloud hosting to manage the server-related tasks. Reach me through the comment section if you need assistance.


This is a really helpful step-by-step guide! SFTP setup often feels intimidating for beginners, but your screenshots and clear instructions make the Rapyd Cloud process very simple to follow. I especially liked how you explained the importance of keeping the private key safe — that’s a point many overlook. Using FileZilla with key-based authentication definitely adds an extra layer of security. Great tutorial for developers and website owners who want secure file management!”
Excellent tutorial! The step-by-step process makes creating SFTP access in Rapyd Cloud super easy, even for beginners. I appreciate how clearly you explained the private and public key setup and integration with FileZilla. Secure file transfers are a must, and guides like this are invaluable for developers. Great resource
to bookmark!