In this blog post, let’s see how to edit .htaccess file in Cloudways hosting, and along with that, I will tell you how to execute the 301 redirections in the Cloudways server. You need to use the .htaccess file to redirect the pages of your WordPress site; hence, I’m taking an excellent opportunity to explain both in a single blog post.
I appreciate your hosting choice because you have chosen a credible server prioritizing web security. For easy understanding, I have planned to write the step-by-step guidelines and also capture a helpful video to implement both tasks. Before getting into the details, let me explain the uses of the .htaccess file in WordPress. Let’s get into the details!
Disclosure: We get a commission when you buy a product via our affiliate link at no additional cost.
Table Of Contents
What are The Uses Of .htaccess File In WordPress?
.htaccess denotes hypertext access, a hidden file to configure additional features for your website hosted on an Apache web server. You can edit this WordPress core file without modifying the server configuration settings.
Even though this plain text file is located in the root directory, you can do several tasks like blocking specific IPs, changing the default index page, redirecting URLs, protecting your server directories with a password, configuring an SSL certificate, and a few more by writing the directions in it.
Yes! You can use the .htaccess file to control website access, manage redirects, and customize server behavior!
For Example:
- It lets you implement security controls (like password-protecting your site, blocking specific IP addresses, or stopping certain bots from accessing your site).
- You can set up URL rewriting and redirects (such as permanent or temporary redirects, forcing HTTPS or www/non-www versions, or sending a domain to a subdirectory).
- You can also tweak PHP and server settings (like adjusting upload limits, enabling directory listing, setting custom index pages, enabling mod_rewrite, or stopping PHP execution in specific directories).
Now, let’s learn how to edit the .htaccess file in Cloudways managed hosting!
How to access .htaccess file in Cloudways?
Let me explain where the .htaccess file is located in Cloudways and how to edit it!
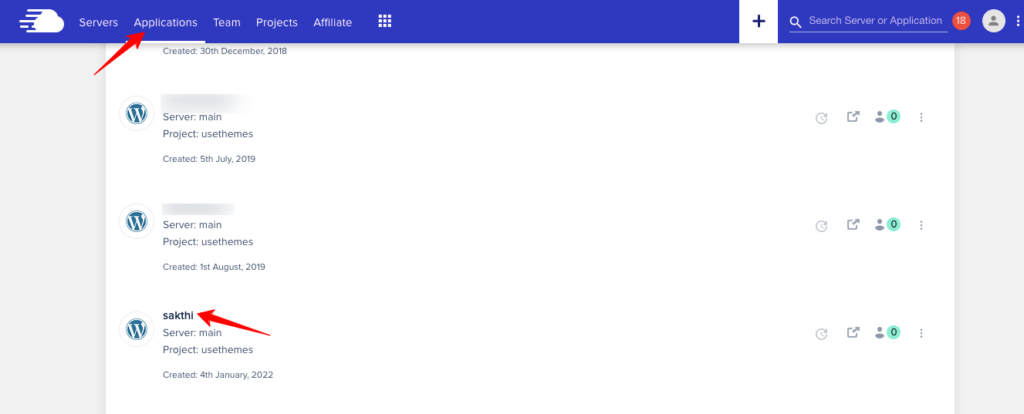
Step 1: Log in to your Cloudways account. Go to “Applications” in the top menu and click the application you want to access the hidden file in.
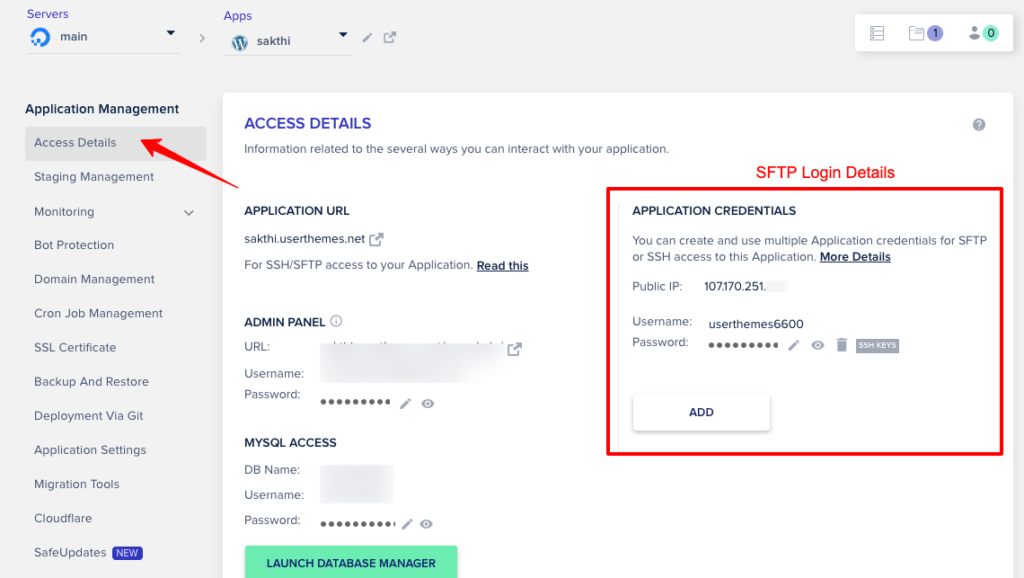
Step 2: To access the .htaccess file, you need the SFTP login details. If you need help creating this secure login, check the blog post on how to get SFTP login in Cloudways, which contains a video tutorial with detailed explanations.
Step 3: You need a file server (FTP Client) to use the SFTP login. I always recommend using the third-party software FileZilla.
Enter your hostname, username, and password. All these credentials are available in your Cloudways account (refer to the video, where they are located on the right side). And enter 22 in the port field; it is the value for the SFTP server.

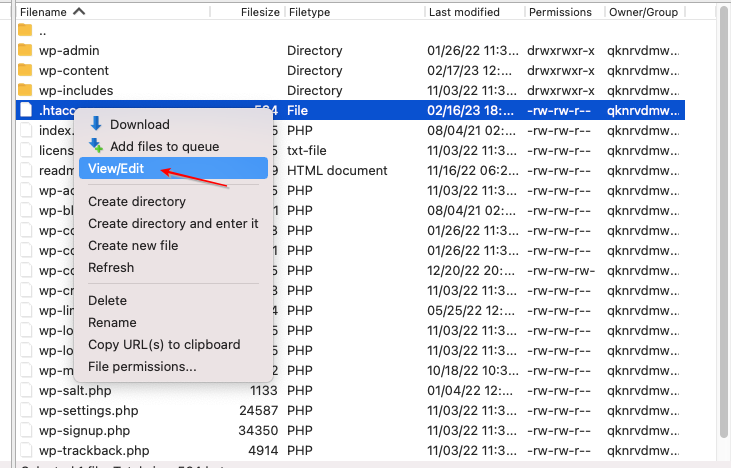
Step 5: After entering all the details in FileZilla, click the Quickconnect button. After the server connection, click on the Public_html folder to see the .htaccess file shown in the screenshot above.
It is the easiest way to access the .htaccess file in the Cloudways server. However, the WordPress plugin is available to get this task done, but I would say that the intruders are smart in finding loopholes through vulnerabilities.
So, you have learned some useful stuff from this Cloudways htaccess tutorial for beginners. Now, let’s see how to set up 301 permanent redirects via .htaccess on Cloudways. Before that, you should know when and how to do it.
When & How To Do WordPress Redirections?
As the name implies, you are redirecting the users and search engines from one page to another. Sometimes, you may have to delete a page or change your domain. To avoid a 404 error, it is better to redirect your traffic to some other relevant location of your website through 301 redirections.
You might ask, Does 301 redirection impact SEO? My answer is “Yes.” Because it has to be done meaningfully; otherwise, you will see a negative impact on your SEO. Not only SEO, but you should also have an eye on site speed, security, and mobile friendliness while redirecting your page to a new location.
How to do 301 Redirection in Cloudways?
Now, let’s see how to create 301 redirection on Cloudways hosting server. For this, you have to use the .htaccess file.
Step 1: Open the .htaccess file by right-clicking and clicking the View/Edit option. The hidden file is now opening with its default content.
Step 2: Open both URLs (the page to be moved and the new location) and head toward the .htaccess file. Type Redirect 301, and paste the slugs of both pages as shown below.
Redirect 301 /old-page-slug/new-page-slug/Note: You only need to paste the URL slugs, not the entire URL.
Example: I will redirect my sample page to the contact us page, so you need to write the code as shown in the screenshot.
Redirect 301 /sample-page /contact-us/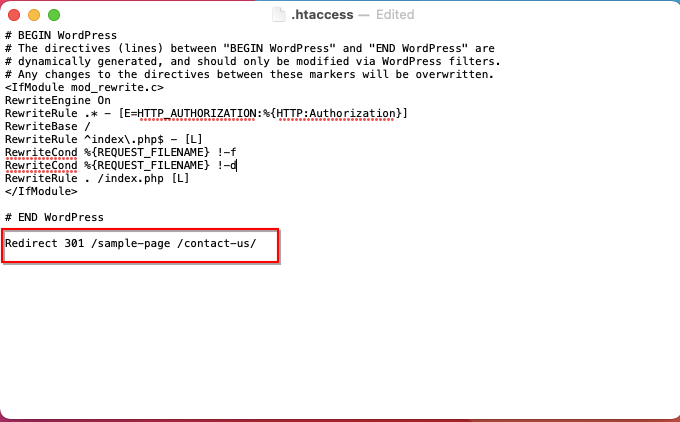
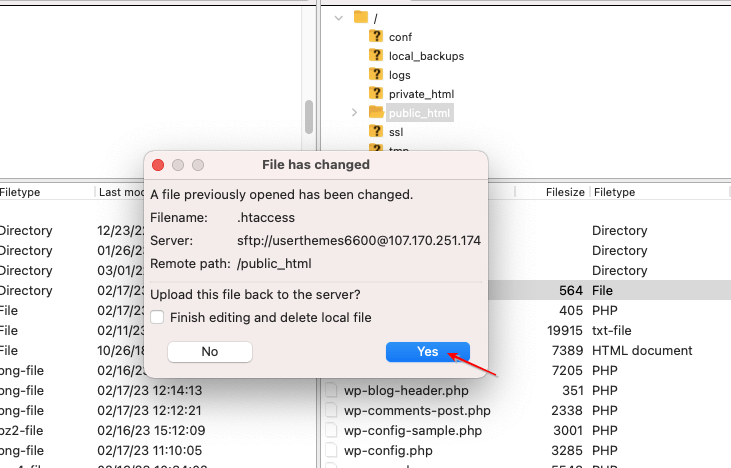
Step 3: Save this file. Now, FileZilla will ask whether to save the changes or not. Just give “Yes,” and now the modifications will get saved in the .htaccess file.
Step 4: Refresh the moved page and check; it will take you to the page that you have redirected. You have successfully shifted the old page to the new page using Cloudways hosting.
So, you have learned how to do the 301 redirections and edit the .htaccess file in Cloudways hosting in this content.
Video Tutorial To Edit .htaccess File For 301 Redirection in Cloudways
If you find it difficult to follow the step-by-step instructions, here is a video tutorial that teaches you how to edit the .htaccess file for 301 redirections in Cloudways managed hosting.
Wrapping Up
The .htaccess file allows you to control your WordPress site completely. You can configure all the server settings in this hidden file. When using reliable hosting like Cloudways, you don’t need to worry about editing the .htaccess file and security breaches, as it mainly focuses on preventing DDoS attacks and mischievous web traffic.
Likewise, moving the pages through 301 redirections is a cakewalk on the Cloudways server. You must edit the .htaccess file through SFTP login and write the rules. However, ensure to do it correctly to get the SEO benefits and boost the organic traffic. Do you have any questions about the guidelines or the video tutorial? If so, catch me in the comments.
Other Cloudways Tutorials
How To Create a Subdomain in Cloudways?
How To Clear Cache In Cloudways?