Have you ever created subdomains for your main domain? What are its benefits? And how to create a Subdomain in Cloudways hosting? Let’s see all the details in this post.
A subdomain is an extension of the main domain, and search engines treat it as a separate site. Creating a subdomain is a simple task and yes, you need to undergo some technical steps.
I have seen many bloggers and site owners create a subdomain for a specific event and let visitors access that part without having to navigate through unnecessary content.
We also create domain extensions to test the plugin & theme features, as well as conduct Google ranking experiments for our niche content.
Therefore, if you have a complex website, it would be better to create subdomains, as they are considered separate sites but linked together under the primary site.
Subdomains have several advantages! Let’s review them, and then we will proceed with the steps for adding the subdomain to Cloudways hosting.
Disclosure: We get a commission when you buy a product via our affiliate link at no additional cost.
Table Of Contents
- What Are The Benefits of Creating Subdomains?
- How to Create a Subdomain in Cloudways Server?
- Video tutorial for Cloudways subdomain setup?
- How to Add SSL to Cloudways Subdomain?
- Troubleshoot Subdomain Issues
- Linking Cloudways Subdomain To Main Website – FAQs
- Can I use multiple subdomains within a single account?
- Is it possible to create A staging subdomain in Cloudways?
- Does Cloudways charge extra for adding Subdomains?
- Wrapping Up
What Are The Benefits of Creating Subdomains?
- Subdomains are easy to create without any additional cost.
- It increases the site crawl rate and helps to get higher search engine rankings through topical authority.
- A website can be well-organized with subdomains; structured content will attract more visitors.
- You can easily establish your brand identity with the domain extension.
- It is more likely to target the audience in different geographic locations to get international reach for your business.
- You may launch an eCommerce store or a mobile site through a subdomain.
- If you want to examine the features and test the performance of plugins and themes, the subdomain will come to the rescue.
- When any of your subdomains get penalized by Google, it doesn’t affect the other subdomains and the primary site.
- You can use the website section to learn and experiment with understanding the search engine algorithms.
- Subdomains are well-suited for collaborative work. You don’t need to share the login credentials of the main site. Instead, you may grant access to the specific sub-sites to complete tasks such as editing/writing content, and testing third-party tools
How to Create a Subdomain in Cloudways Server?

We have been a proud user of Cloudways hosting service for the past eight years. It is a superfast managed hosting for dedicated businesses and professional bloggers to optimize their web assets for the latest tech trends and pass core web vitals assessments.
Now, let me guide you through the simple process step by step, so you can also configure a custom domain on your Cloudways server.
Step 1 – Log in to your Cloudways account and enter the Admin Panel section.
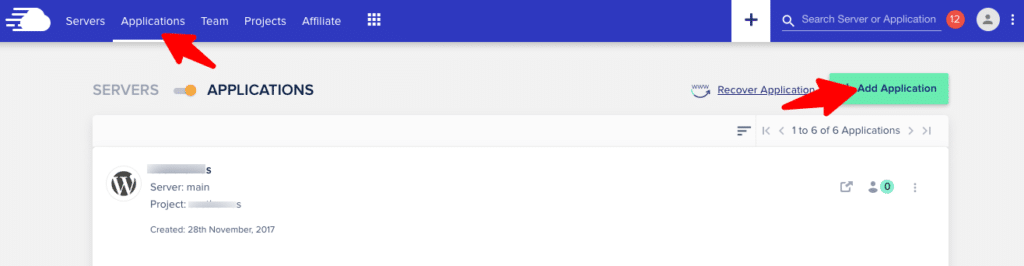
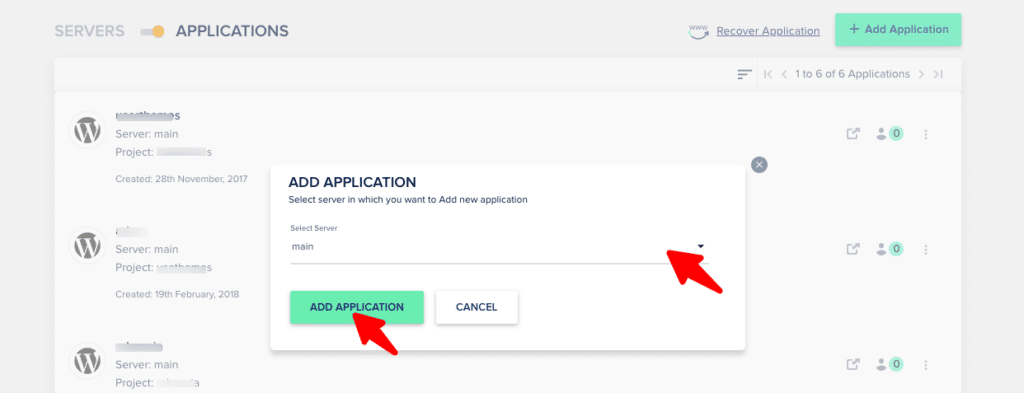
Step 2 – On the top menu, click Applications > Add Applications > Choose Main Server > Add Application
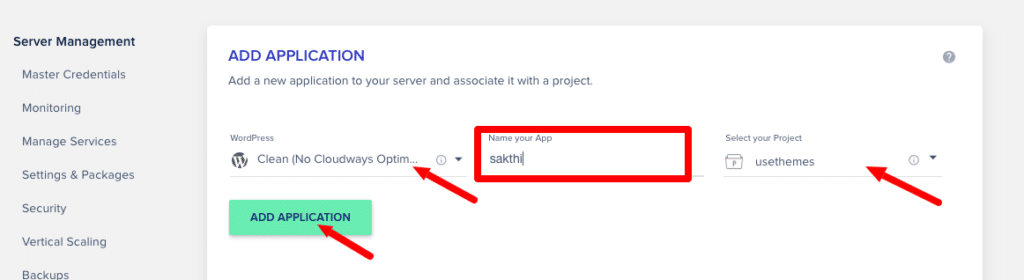
Step 3 – In the Select Application setting, choose the WordPress version, give a name for your Subdomain, and under “Select your Project,” pick your main domain. Click – Add Application.
Step 4 – Now that your subdomain has been installed, you will see a message for it. Go to Applications > Newly Created Sub Domain. You can see the default “WordPress Admin Panel URL” created by the Cloudways hosting.
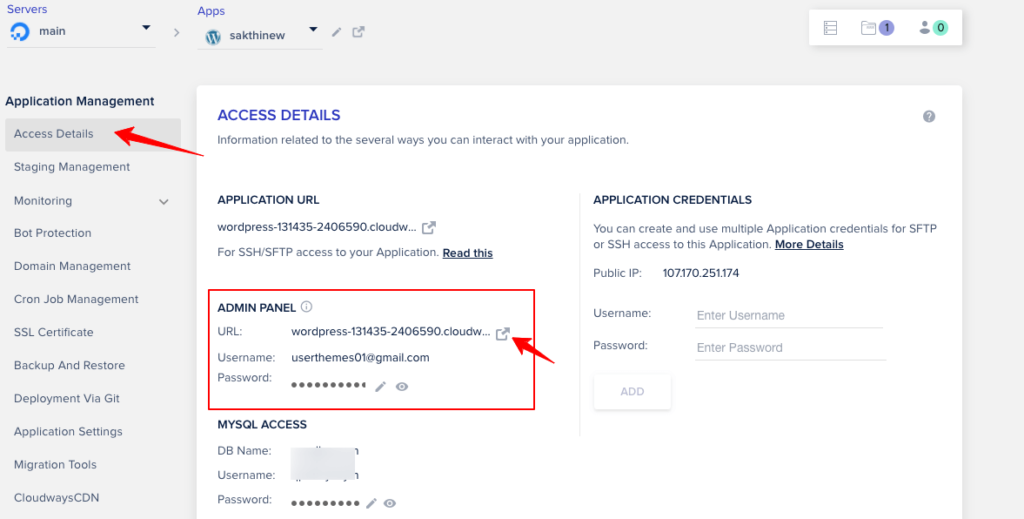
Step 5 – Click that URL; your Subdomain will open in a new tab. However, we have to point the Subdomain to the domain-registered website.
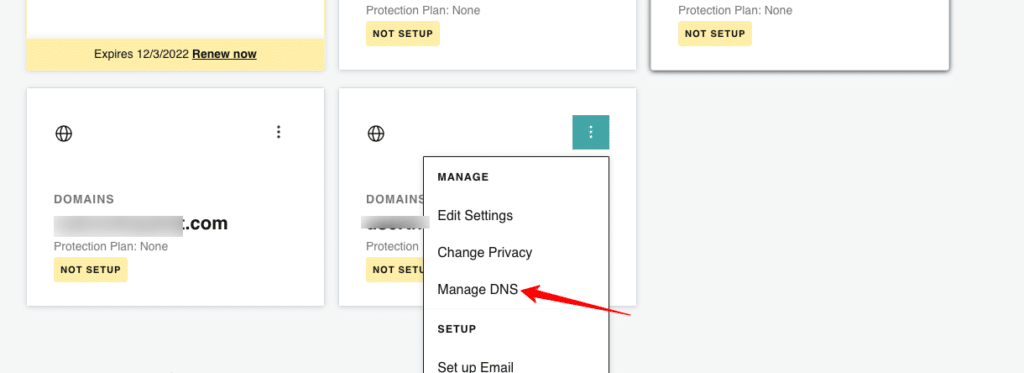
Step 6 – To point the Subdomain, copy your Cloudways Public IP and visit the domain-registered site, like GoDaddy, Namecheap, or any domain name registration.
Step 7 – If GoDaddy, log in to your account and click “My Products.” Under “Domains,” click “Manage DNS” to add the records.
Step 8 – Click the “Add” button. Now, you need to enter four values: Type, Name, Value, and TTL, respectively, as A, @, public IP (which we have copied from the Cloudways admin panel), and Custom (600 seconds). Hit “Add Record”
Step 9 – After adding the “A” record, we will include the “CName” record through the same procedure.
Click “Add” and enter the values for Type, Name, Value, and TTL as CName, Sub Domain Name, the default WordPress admin panel URL (as shown in the Cloudways dashboard), and Custom (600 seconds), respectively. Hit “Add Record.”
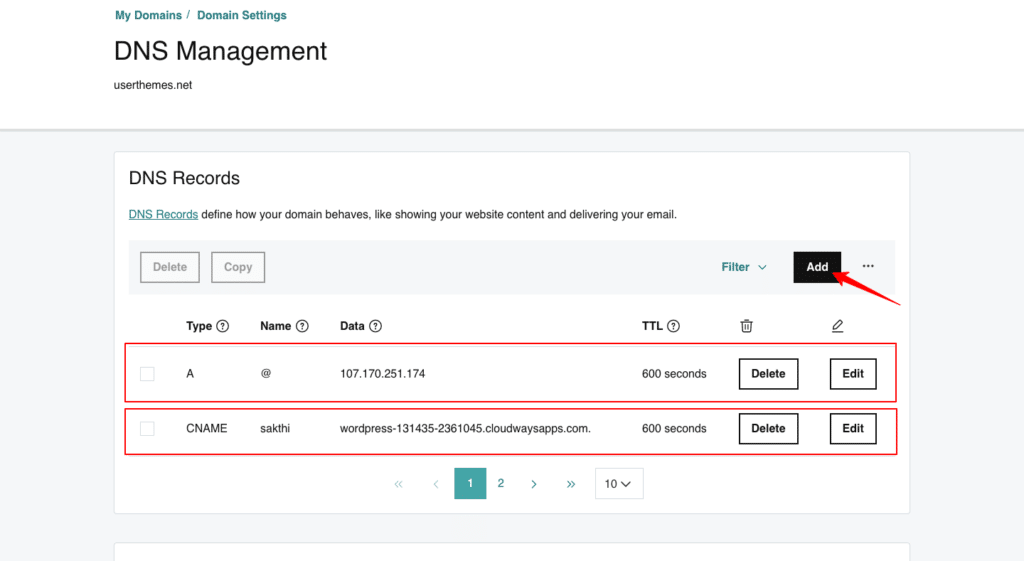
Note – While entering the Admin panel URL, exclude “https://.”
We have successfully added the records to the domain registration site to point to the subdomain.
Step 10 – Go to Cloudways Admin settings > Domain Management. Give the name for the Primary domain as “SUBDOMAIN NAME.MAINDOMAIN.COM.” Click “Save Changes” to update your Subdomain.
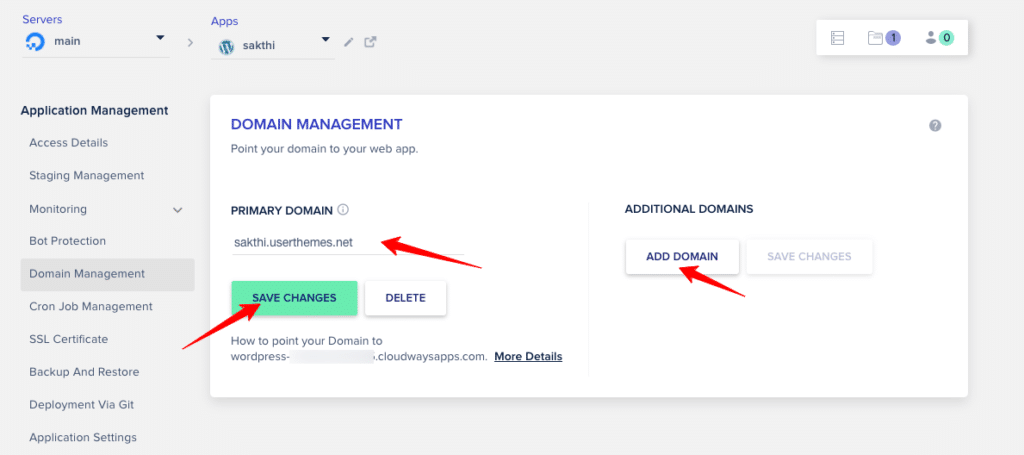
Example – themetesting.wpglossy.com (Subdomain + Main domain)
Step 11 – You should not forget to install the SSL certificate for the created Subdomain. Go to “SSL Certificate” and enter your Email Address and Subdomain name. Click “Install Certificate.”

The SSL installation will take a few seconds, and you will get a message that the SSL has been installed. Now click “Save Changes.”
Step 12 – Go to “Access Details” and look at the Admin panel URL. It will be updated with the URL of the newly made Subdomain. Just click it and verify the URL of your Subdomain. You can see the updated URL.
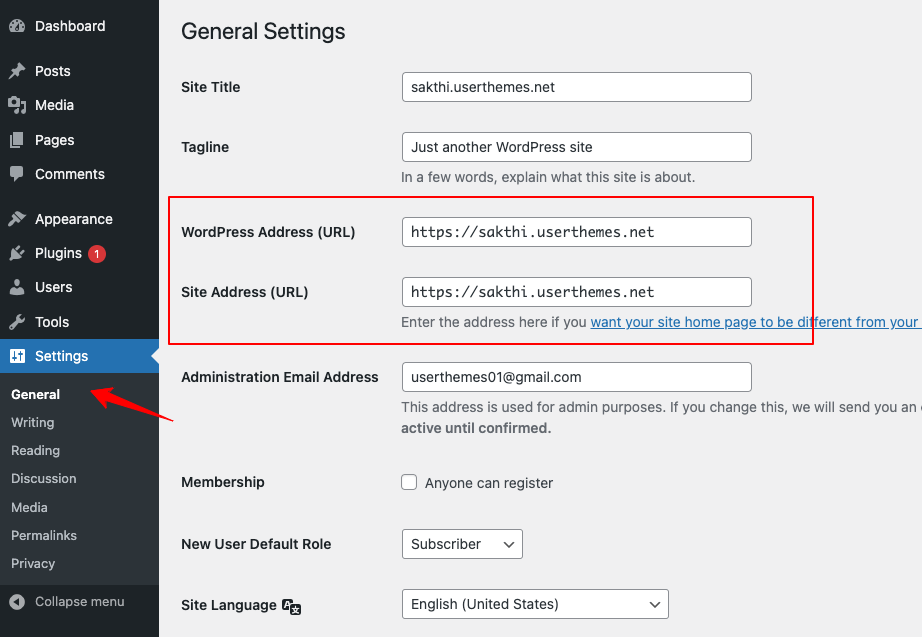
You may confirm this by visiting WordPress Dashboard > Settings > General. Check “WordPress Address” and “Site Address.” Both will be the same.
Video tutorial for Cloudways subdomain setup?
If you are in a rush and don’t have time to read the step-by-step guidelines to add subdomain in Cloudways platform, here you go!
Watch the video tutorial; I have clearly shown all the settings and steps to be executed.
How to Add SSL to Cloudways Subdomain?
The free Let’s Encrypt SSL is available for both primary and subdomains. Here how to install!
Go to Cloudways Dashboard Settings > Application Management > SSL Certificate. Enter your subdomain and click “Install Certificate”.
Within seconds, your subdomain will get HTTPS secured.
Troubleshoot Subdomain Issues
In case your site extension is not working, try these fixes:
- DNS Propagation delay – Wait up to 24 hours for global DNS updates
- Incorrect Record – Check that you have used the correct A or CNAME record
- SSL Error – Reinstall the SSL certificate
- Cache issue – Clear your CDN and browser cache
Linking Cloudways Subdomain To Main Website – FAQs
Can I use multiple subdomains within a single account?
Yes! Cloudways allows you to host several subdomains in a single account. You can manage them from the same server dashboard.
Is it possible to create A staging subdomain in Cloudways?
Yes! You can create staging environments that function as subdomains for safe testing before pushing the updates to the live site.
Does Cloudways charge extra for adding Subdomains?
No! There is no additional cost to create or manage subdomains on Cloudways. You are responsible for paying for the server resources you use.
Wrapping Up
The subdomains are beneficial in streamlining your website’s hierarchy through which you can offer the best user experience for your visitors. It also enhances your SEO performance by incorporating keywords into the URL and facilitating faster content indexing.
I’m glad to teach you how to create a subdomain in Cloudways hosting. What is your experience with Cloudways managed server hosting? Do you understand the procedure to manage multiple domains on Cloudways? Feel free to share your thoughts in the comment section.
Have I written other Cloudways Tutorials?
How To Create SFTP Login In Cloudways?
I am a beginner in the digital marketing field so I had no idea about the subdomains but now after reading this, I know about it and its benefits. Thank you for sharing such useful information.
Thanks for posting such an amazing blog and the introduced content is exceptionally virtuous. will surely share with my friends.