Do you want to learn how to configure the Breeze cache plugin developed by Cloudways hosting? I’ll explain it in this blog post.
As you know, website speed is one of the most important ranking factors, and if your site takes more than three seconds to load, your visitors will leave and you will lose potential sales and subscribers.
If you want to speed up your WordPress site (especially on Cloudways), configuring the Breeze Cache plugin correctly can make a huge difference in loading speed, Core Web Vitals, and SEO rankings.
I’ve been using Cloudways hosting since 2017, and across multiple WordPress projects I’ve tested almost every major caching plugin.
From my experience, Breeze Cache Plugin is one of the most stable solutions when used on Cloudways, because it is tightly integrated with their server stack (Varnish + Nginx + Apache).
This guide is not just theoretical! it’s based on real-world testing, mistakes, and optimizations. I’ll walk you through the best Breeze settings, explain what each option does, and show you how to avoid common issues.
Before getting into the setup options, I would like to explain the best features of this WordPress cache plugin. Let’s get started!
Disclosure: We get a commission when you buy a product via our affiliate link at no additional cost.
Table Of Contents
What is Breeze Cache Plugin?

Breeze cache plugin is a lightweight WordPress caching plugin developed by Cloudways to simplify performance optimization.
Unlike traditional caching plugins that rely heavily on WordPress-level caching, Breeze works at multiple levels:
- Application-level caching (WordPress)
- Server-level caching (Varnish)
- File optimization (minification, compression)
- CDN integration
This multi-layer approach is why Breeze performs exceptionally well on Cloudways. It’s not just a plugin, it’s part of a full performance ecosystem.
Best Features Of Breeze Plugin
Now, let’s take a deeper look at the features of the Breeze Cache plugin so that you would like to install it on your WordPress site.
1. Optimized for Cloudways hosting – Although it is a free plugin, it outperforms some of the best premium cache plugins, like WPRocket and WP Fastest Cache, when used with a Cloudways account.
2. Ease of use – The plugin’s user interface is beginner-friendly and easy to set up. You don’t need to worry about changing many settings to make it work better.
3. Compatibility with Varnish cache – The Breeze cache plugin works with Varnish cache. If you use Cloudways hosting, Varnish comes pre-installed. All you need to do is install the plugin.
4. WooCommerce compatibility – It works perfectly with WooCommerce websites. You don’t need to do any extra setup for that.
6. CDN support – It uses CDN to enhance the speed of the websites by loading the images and videos fast.
7. Minification & Gzip compression – This speed plugin optimizes your codebase and also reduces the bandwidth used by the website. It also compresses the size of your HTML, CSS, and JS files.
8. Database optimization – It cleans up drafted and repeated content, posts revisions, and trackbacks to make the database cleaner and more optimized.
How To Setup Breeze WordPress Plugin?
There is no need to worry about setting up this extension as it handles all the setup. However, there are a few tunings that I would recommend you make through this Breeze configuration tutorial.
| Cache System | ON | Enables full-page caching, the core of performance improvement |
| Gzip Compression | ON | Compresses files to reduce bandwidth and speed up loading |
| Browser Cache | ON | Helps repeat visitors load pages faster |
| Mobile Cache | ON | Ensures optimized caching for mobile devices |
| Lazy Load Images | ON | Loads images only when they are visible on screen |
These are the foundation settings. Without them, your site will rely entirely on server processing, which is slower. Now, let’s see other settings in-detail!
1. Basic Options
Here, you will get the option to automatically delete/purge the cached content after a certain time interval. You can also enable browser caching by enabling the options available at the end of the menu.
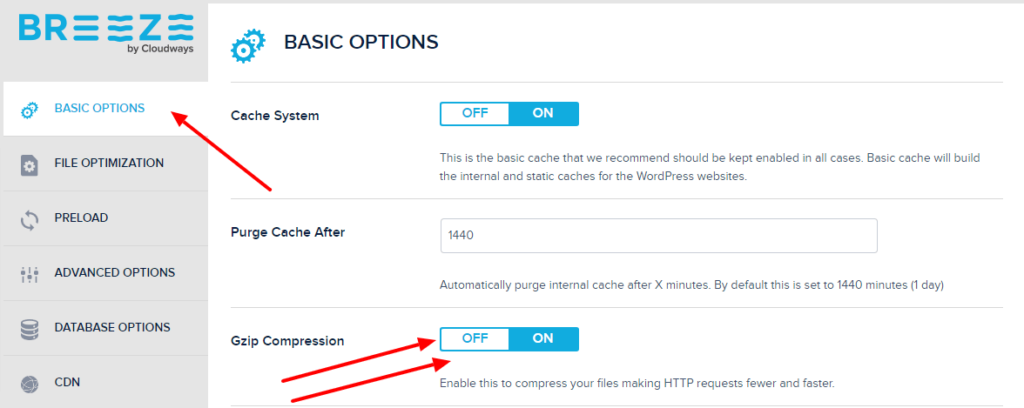
- Cache System → ON
- Purge Cache After – 1440 (Cache Lifespan)
- GZip Compression → ON
- Browser Cache → ON
- Lazy Load Images → ON
- Cross-Orgin Safe Links → ON (To add “noopener noreferrer” to external links)
- Cache logged-in Users → OFF
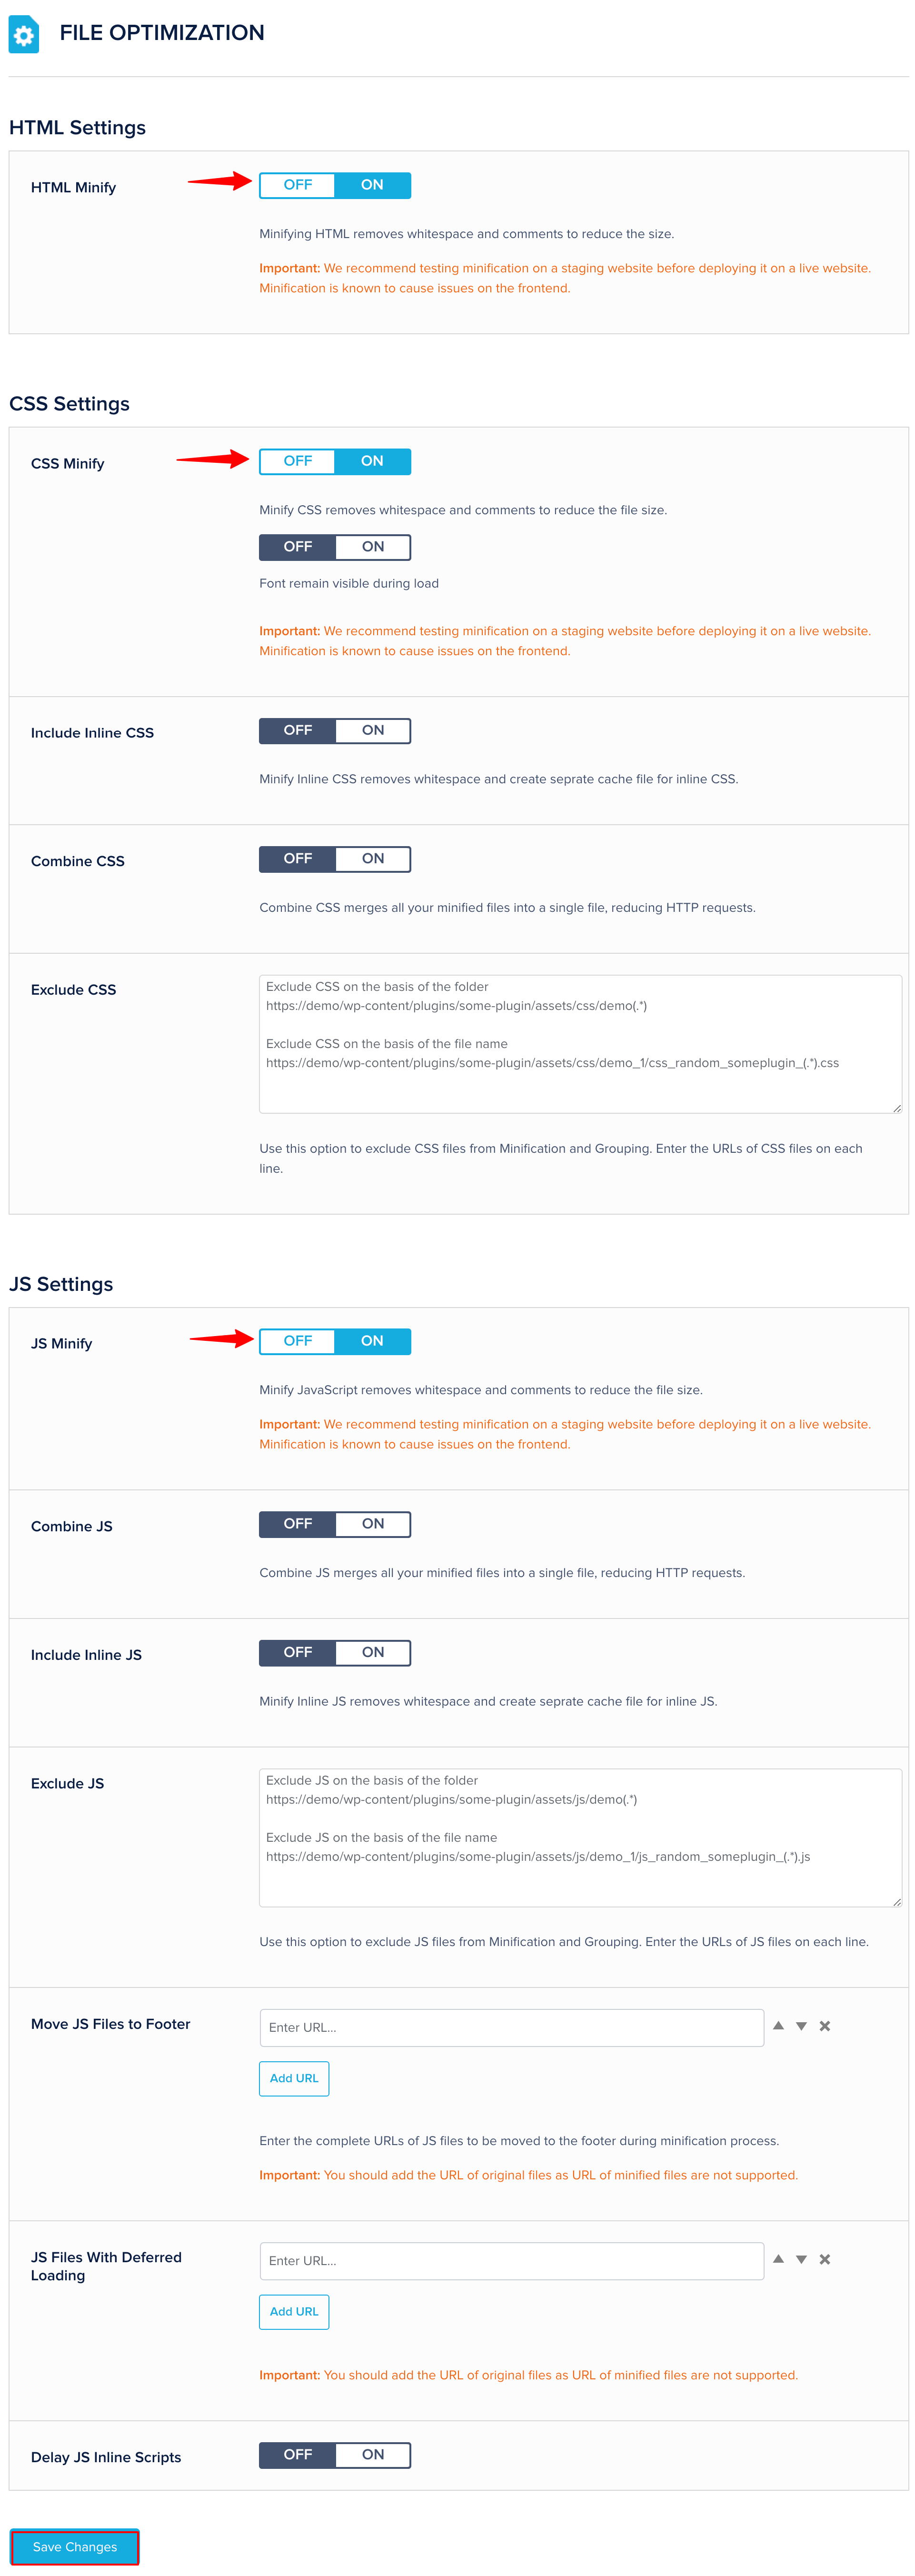
2. File Optimization
This section gives the biggest speed gains, but also causes the most issues if misused.
1. HTML Settings
- Minify HTML → ON
What it does – Removes unnecessary spaces, comments, and formatting from HTML.
Benefits: Reduces page size, Improves load speed without risk
2. CSS Settings
- Minify CSS → ON
- Combine CSS → Test before enabling
Note – Combining CSS can reduce requests, BUT can break layouts (especially with modern themes)
My recommendation: Use minify and avoid combine unless tested thoroughly.
3. JavaScript Settings
- Minify JS → ON
- Move JS to Footer → ON
- Delay JavaScript → Use carefully
Enabling Delay JavaScript Risk – It can break the Sliders, Menus and Third-party scripts
My recommendation: Enable gradually and test every change.
3. Preload
Activating the preload function will boost the speed of your website. For best performance, optimize the URL, which consists only of fonts. Go to the Preload option and add your URL in the Preload WebFont section.
Also, you can easily optimize your website url with the help of the Breeze cache plugin. When you enable Preload links, it will create a cache of any link when hovered over. This will make the page load faster.
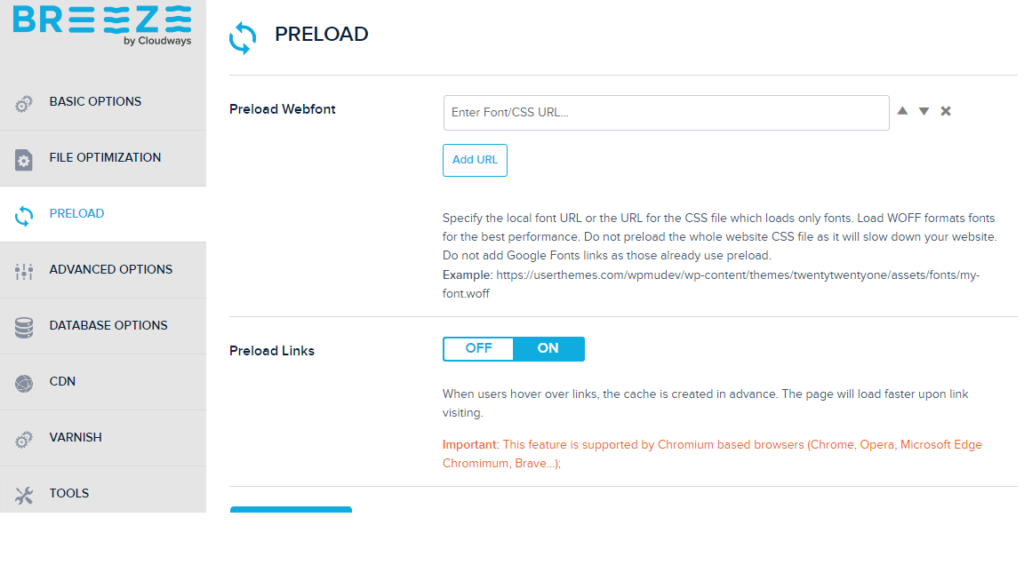
- Preload Links → ON
Note – Enabling this may increase your CPU usage, you should have an eye on it!
Prefetch of DNS request – Enter all third party domains loading on your website
4. Advanced Options
To exclude some files from being minified, go to the ADVANCED OPTIONS section of the settings, and you will get to see two boxes where you can put the URL of the respective files to exclude them.
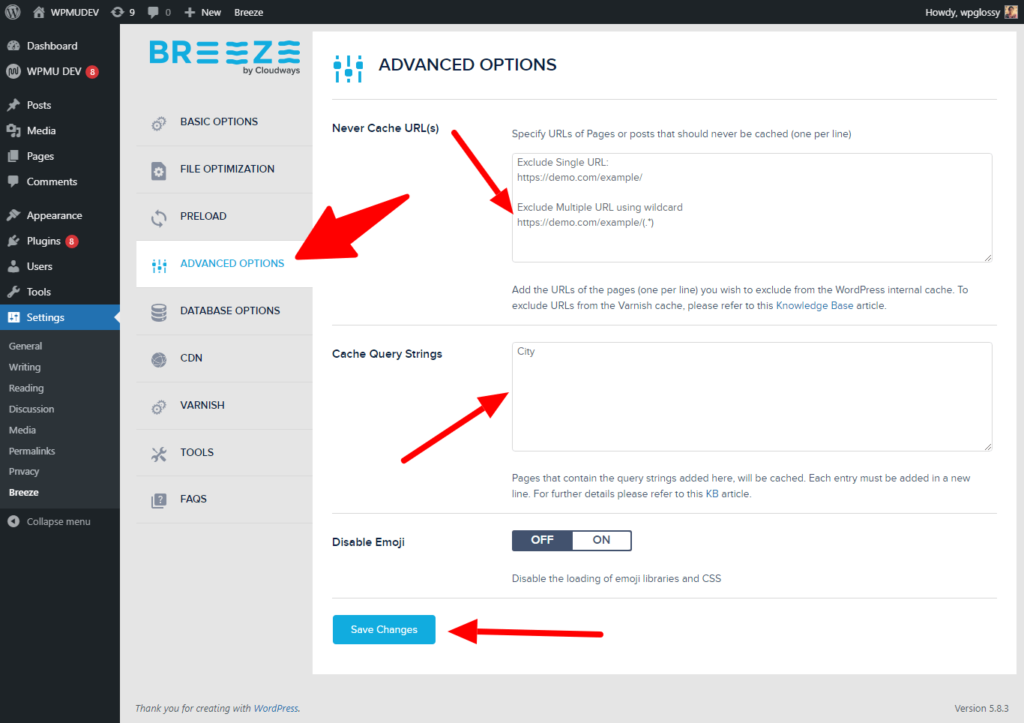
In the advanced section, you also get an option to mark the pages that you don’t need to cache. This feature can be accessed by providing the respective URL of the pages in the Never Cache These URLs section.
5. Heartbeat API
- Control Heartbeat → ON
- Heartbeat Front-end → Disable
- Heartbeat Post Editor → Every 5 minutes
- Heartbeat Back-end → Disable
Note – Check your Cloudways analytics, you will see large amount of requests to admin-ajax. Disabling or limiting the Heartbeat API can lower these requests and CPU usage. When you disable this setting, you will not get the real-time plugin notifications.
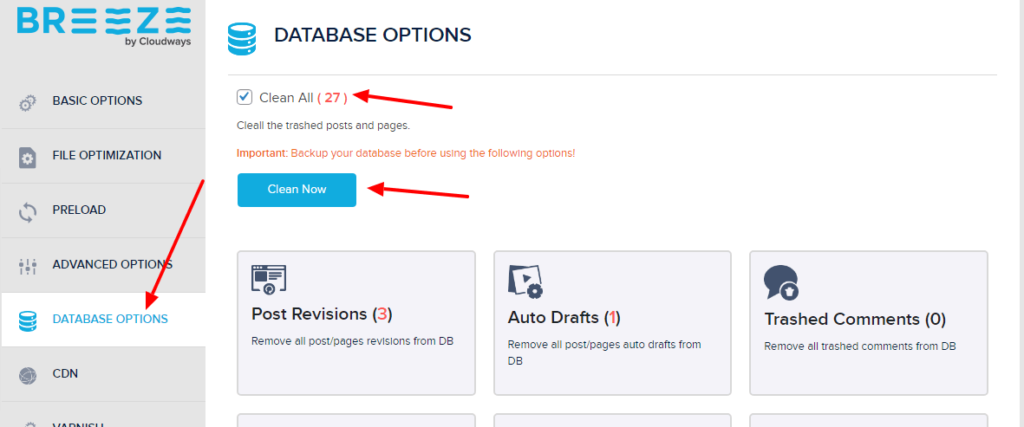
6. Database Options
In the DATABASE section of the settings, Breeze provides options to optimize your WordPress database to make it look cleaner.
You will see options to delete auto-drafted content, post revisions, trashed content, unnecessary comments, trackbacks & pingbacks, and transient options to make your database more optimized.
You can optimize your database with just one click: Check the clean all option and then click “Clean now.”
7. CDN
Visit the CDN section, you will see the option to activate the CDN. In the CDN CNAME section, you have to enter the hostname URL provided by the CDN provider.
The format for entering the URL is already stated in the box below. E.g., if your website contains a combination of HTTP and HTTPS content, you need to put ‘//’ in front of the URL (as in //cdn.mysite.com)
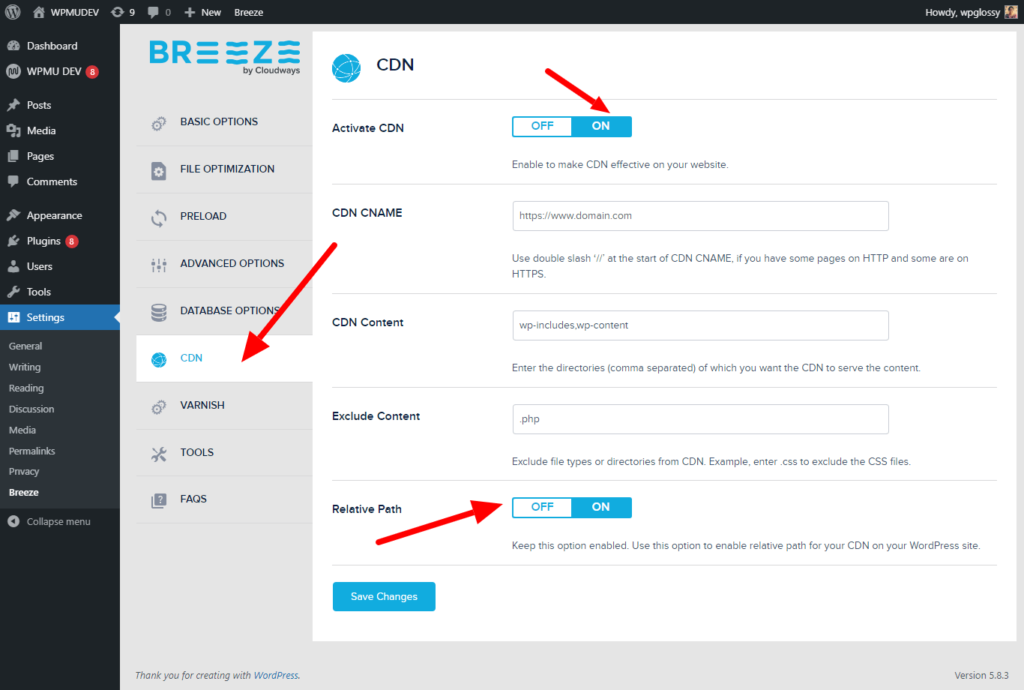
- Activate CDN → ON
- CDN CNAME – Paste your CDN URL
- CDN Content – CDN uses wp-includes and wp-content. You can include more directories
- Exclude Content – Leave as it is
- Relative Path → ON
What CDN does: It stores your content on global servers and serves users from the nearest location.
8. Varnish
In Varnish settings, enable the Auto Purge Varnish option to clear the cache after a specific interval, or you can do that manually by clicking on the Purge option next to the Purge Varnish cache section.
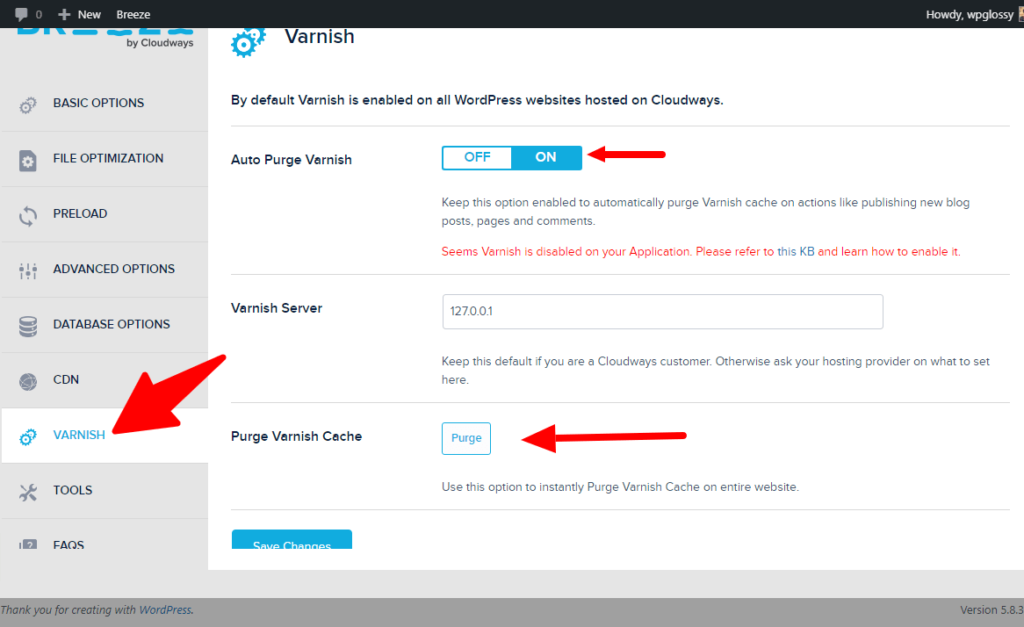
Note – you need to install Varnish cache to get the best out of Breeze. If your website is hosted on Cloudways, it is not a problem as Varnish comes pre-installed with the Cloudways servers.
If you are not a Cloudways user, you need to install Varnish cache and place the proper IP of the server in the VARNISH section of the settings (For Cloudways users, the IP is given by default).
9. Tools
If you want to take a backup of the plugin settings or resetting, use this option. All the settings are self-explanatory!

Common Breeze Issues
1. Layout Breaking After Optimization
Cause – CSS or JS combine settings (This is the most common issue I’ve seen.)
Fix:
- Disable combine options
- Clear cache
- Re-test
2. Changes Not Reflecting
Cause – Cached version still active
Fix:
- Clear Breeze cache
- Purge Varnish
3. No Speed Improvement
Cause – Large images or No CDN or Poor theme/plugin setup
Fix:
- Compress images
- Use CDN
- Audit plugins
Frequently Asked Questions
Is Breeze better than WP Rocket?
If you’re using Cloudways hosting, Breeze is usually the better choice because it is optimized for their server environment (Varnish + Nginx). However, WP Rocket offers more advanced features and hence it is better for non-Cloudways hosting users.
Should I use Breeze with Cloudflare?
Yes, combining Breeze Cache Plugin with Cloudflare is highly recommended. Breeze handles on-server optimization, while Cloudflare improves global content delivery and security.
Does Breeze Cache Plugin work with WooCommerce?
Yes, Breeze Cache Plugin works with WooCommerce, but you must exclude important pages like Cart, Checkout, and My Account. This ensures dynamic content is not cached incorrectly.
Can Breeze break my website?
Breeze itself is stable, but incorrect configuration (especially file optimization settings) can break layouts or scripts. Always test changes and enable features gradually.
How much speed improvement can Breeze provide?
Based on real-world usage, Breeze can improve website speed by 30% to 60%, depending on your site setup, hosting configuration, and additional optimizations like CDN and image compression.
Wrapping Up
I have explained how to configure the Breeze Cache plugin; I hope this content will help you understand its exceptional qualities that could make your site load fast.
This WordPress plugin has been recently updated with the easy ON/OFF buttons in the settings, which you can see in the screenshots above.
So, are you clear with the features and setting choices of the Breeze plugin? Which cache plugin have you installed on your website? Would you like to use this cache plugin by Cloudways?