Do you want to learn how to create conditional header in Kadence theme? Follow this straightforward guide. I have created a simple header for your easy understanding and explained the settings with the screenshots.
Undoubtedly, the conditional header feature helps you build a personalized user experience on your website. The Kadence theme offers this flexibility to design your site header with several elements depending on the context.
Requirement – Before you start, here’s what you need:
- Kadence Theme (free version installed)
- Kadence Pro Add-on (required for conditional headers feature)
The conditional display feature is part of Kadence Pro header features, so it won’t work in the free version alone. Use our exclusive Kadence discount code to claim the discount.
Now, let’s see how to implement this impressive feature!
Disclosure: We get a commission when you buy a product via our affiliate link at no additional cost.
Table Of Contents
- Step-By-Step Guide To Make Kadence Conditional Header
- Why Should You Design a Conditional Header?
- When Should You Use Conditional Headers?
- Common Issues & Fixes
- Frequently Asked Questions
- 1. Is the conditional header available in the free Kadence theme?
- 2. How To delete this Kadence header?
- 3. Is this header enabled by default in the Kadence theme?
- 4. Can I create headers for logged-in users only?
- Wrapping Up
Step-By-Step Guide To Make Kadence Conditional Header
Step 1: Log in to your WordPress dashboard and go to Appearance > Customize
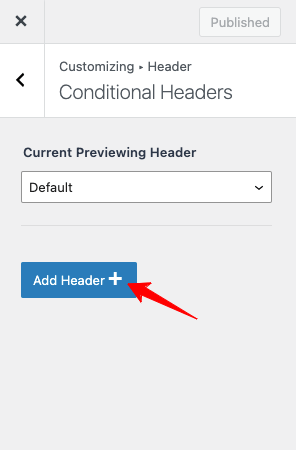
Step 2: Go to Header > General > Conditional header

Step 3: After selecting the conditional header, click “Add Header+”
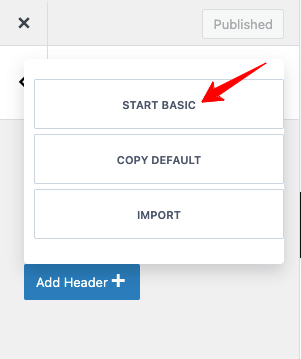
Step 4: Choose “Start Basic Header”
Step 5: After choosing this option, an extra header with the setting options will appear.
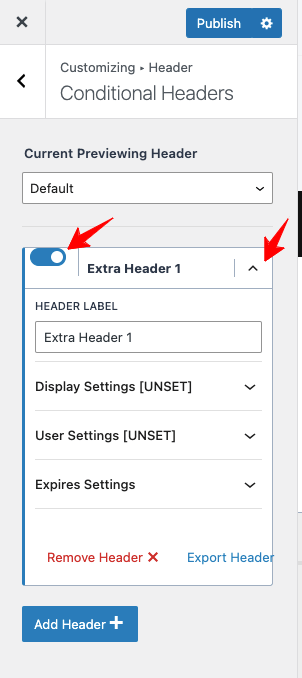
Step 6: You have to choose that extra header in the drop-down menu of “Current Previewing Header.” Then, you will be able to see the new design header live.

Step 7: I have designed a simple header for your reference. Look at the settings options.

Output Header

Step 8: I made this header for my contact page and named it “Contact Page Header.” You may name as per your wish.
Step 9: I have chosen “Display Settings“. Keep the following image as a reference and do the settings.
1. Show on – Single Pages
2. Select Page By – Individually
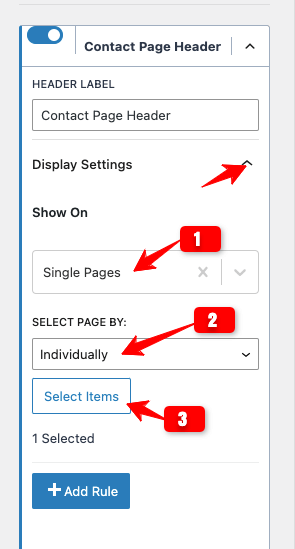
3. Select items – Select the page where you want to apply the conditional header. After choosing that page, click “Select“

Step 10: Let’s do “User Settings”.
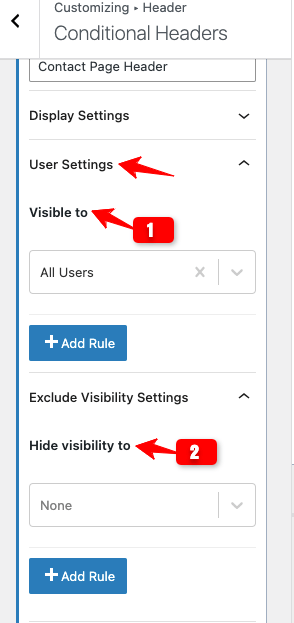
Step 10: After completing the “User Settings, ” move on to the “Expires Settings“. Just enable the settings and fix the expiry date for your conditional header.

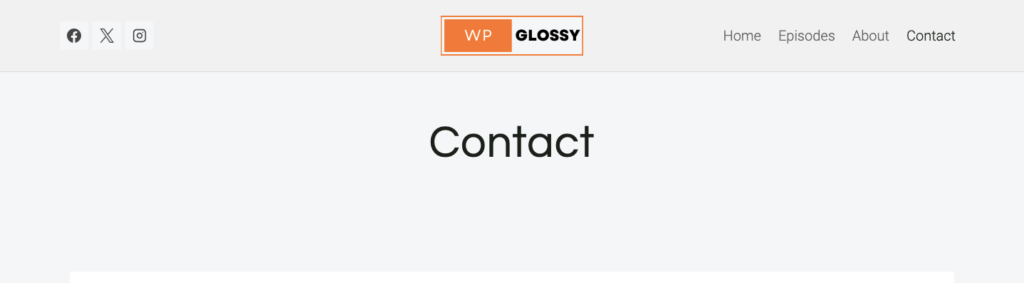
Now, check the default and conditional header!
Default Header

Conditional Header
I have made a simple conditional header in the Kadence theme to show the settings preferences and let you know how easy it is to use.
You may make a personalized one for your visitors to establish your brand identity. Use the options to add a unique header to specific pages or blog posts.
Why Should You Design a Conditional Header?
A conditional header allows you to display different headers based on specific conditions. It has many benefits!
- Enables contextual navigation, especially for e-commerce sites
- Acts as a seasonal header during special events without modifying the default header
- Increases user engagement to reduce the bounce rate, which in turn helps your SEO
- Boosts the conversion rate through an optimized header that includes CTA and offers
- Enhances mobile experience through a streamlined header made for small screens
When Should You Use Conditional Headers?
Here are real-world scenarios where Kadence conditional headers are extremely powerful. Here are some high-converting use cases I present as examples.
Landing Pages
- Remove navigation for better conversions
- Add CTA-focused header
Blog vs Homepage
- Minimal header for blog
- Full branding header for homepage
Logged-in Users
- Show dashboard links
- Hide login/signup buttons
Seasonal Campaigns
- Display promotional header
- Set expiry for automatic removal
WooCommerce Stores
- Different header for shop vs checkout
- Simplify checkout experience
Common Issues & Fixes
Issue 1: Header Not Showing
Fix:
Check display conditions
Ensure correct page targeting
Issue 2: Wrong Header Appearing
Fix:
Check header priority
Disable conflicting headers
Issue 3: Changes Not Reflecting
Fix:
Clear cache
Disable CDN temporarily
Issue 4: Global Header Override
Fix:
Ensure the conditional header has a higher priority
Frequently Asked Questions
1. Is the conditional header available in the free Kadence theme?
No! You should get the Kadence Pro theme to get this feature.
2. How To delete this Kadence header?
You must click the “Default” option in the Current Previewing Header and confirm. You may also use the “Remove Header” button.
3. Is this header enabled by default in the Kadence theme?
No! It is not activated by default. Go to Appearance > Kadence and turn on this feature.
4. Can I create headers for logged-in users only?
Yes, using user-based conditional logic.
Wrapping Up
Conditional headers serve your audience’s needs when they are well designed. Kadence’s theme has several fantastic qualities, and it is one of them.
If you want to create dynamic, user-focused WordPress websites, learning how to use conditional headers in Kadence theme is essential. While the setup is simple, the real value comes from how you use it strategically.
I’m glad you are leveraging conditional headers to build a versatile website to support your business goals. Undoubtedly, Kadence conditional headers with smart UX design give you a serious edge over generic websites.
I have done my best to explain the settings for this feature. If you need help, contact me via the comments. As I’m using this excellent WordPress theme to design my client sites, I can help you with your difficulties.