I assume you are a Divi theme user and want to design the Divi fixed header. In this blog post, I will tell you how to make a Divi header sticky.
Divi Sticky options offer a new level of control that provides extreme design flexibility. Yes, this advanced system contains scroll-based interaction for a high user experience.
Before we get into the Divi Sticky Header tutorial, let me summarize the benefits of introducing it.
Disclosure: We get a commission when you buy a product via our affiliate link at no additional cost.
Table Of Contents
Why Make Divi Header Stick To the Top of Page?
Having a sticky site header offers several benefits! They are
Easy Navigation – As the main menu is always displayed, users will feel comfortable navigating your website. It reduces their frustration and saves time since they don’t need to revisit the top of the page to grab the information they are looking for.
Brand Visibility – A professionally designed header with your business details is always visible to your audience; your brand identity will be constantly reminded and establish trust, improving your online visibility.
High conversions – A precisely designed sticky header can gently push your readers to react to your call to action. This will increase your business sales or leads. So, you may wisely use this place to fill out a form or make them purchase your products.
Step-By-Step To Design Divi Sticky Header On Scroll
A floating header can contribute to a smoother user experience and increase conversions. Let’s build a sticky header in the Divi theme without CSS code.
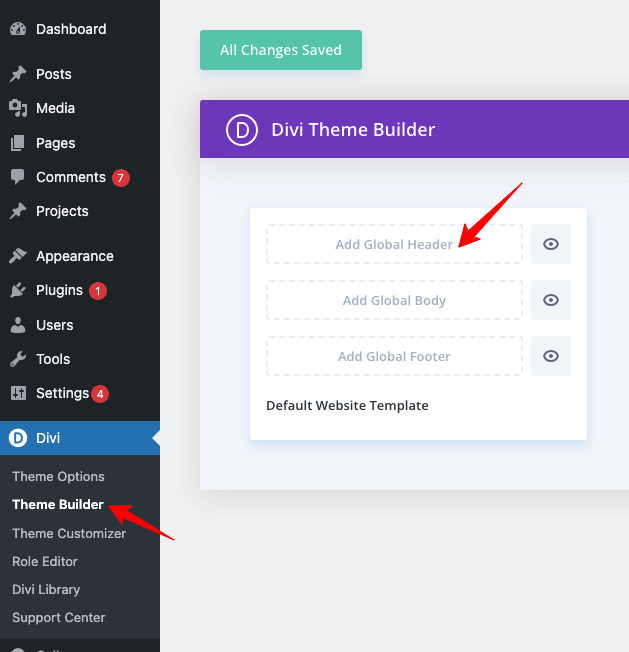
Step 1 – Visit WordPress Dashboard > Theme Builder
Under “Divi” settings, you can see three sections.
Step 2 – Click Add Global Header > Build Global Header.
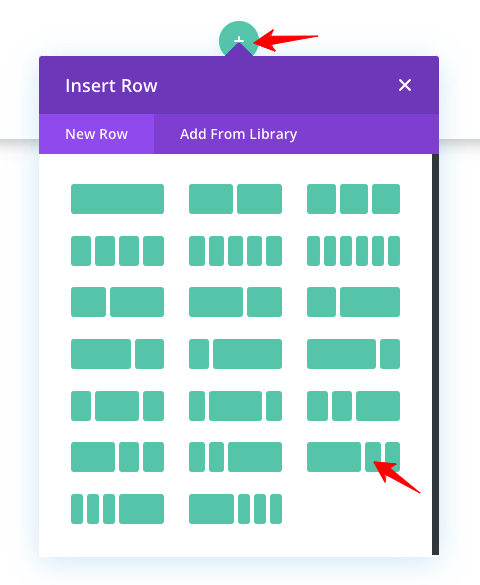
Step 3 – Now, click the “+” symbol to pick the structure. I chose a three-column structure, and you may pick the suitable one as per your requirements.
Step 4 – Add a Navigation Menu and Logo through the “Main Menu” module in the first column. Next, add social media buttons in the second column with the help of the “Social Media Follow” module.
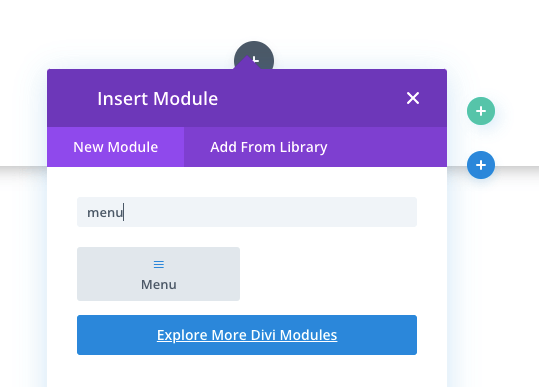
In the 3rd section of the Divi Header, let me add the Search feature through the “Search” Module.
Step 5 – Click the green tick button to save the changes.
Note – To customize each element and adjust the extra white spaces, please watch the video for a clear understanding.
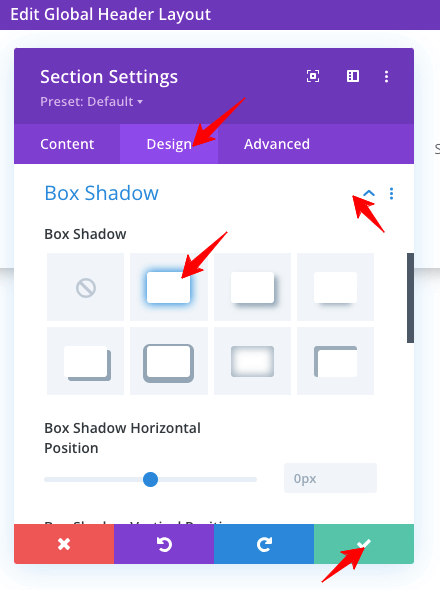
Step 6 – I gave a shadow effect for the header to make it visible when it is made sticky. Use the “Shadow Box” settings and save all the changes.
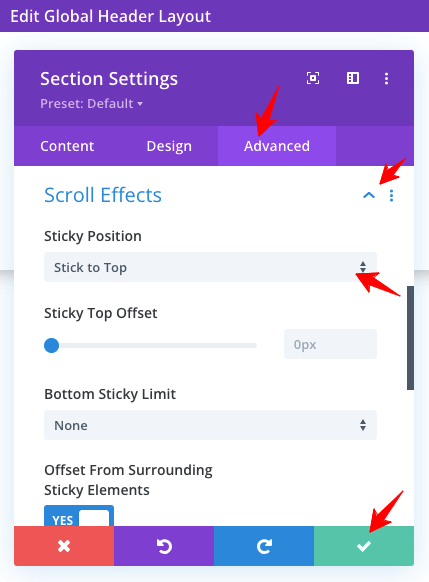
Step 7 – Now, it’s time to activate the scroll effect. To do so, click the Section settings and go to its “Advanced” tab. Under “Scroll Effect,” pick – Stick to Top from the Sticky position settings. Don’t forget to save the settings.
Step 8 – Go to your WordPress Dashboard > Divi builder, click the green button – All Changes Saved. Now, you may look at the output by refreshing the design page.

Video Tutorial To Add Sticky Header In Divi Theme
In the video tutorial, I clearly explained how to design a Divi theme header and make it sticky!
Advanced Divi Sticky Header Effects
Most tutorials stop at “make it sticky.” That’s not enough anymore.
1. Shrink Header on Scroll
Instead of keeping a large header, you can reduce its height when the user scrolls.
This gives more space for content while keeping navigation accessible. It’s widely used in modern UI design and works particularly well for blogs and SaaS sites.
2. Change Logo on Scroll
You can dynamically switch:
Large logo → compact logo
Light logo → dark logo
This is useful when combining transparent headers with scroll-based color changes.
3. Transparent to Solid Header
- Transparent header over hero section
- Solid background after scrolling
This improves visual appeal while maintaining readability.
4. Sticky Header Only After Scroll
Instead of showing it immediately, the header appears only after the user scrolls past a certain point. This creates a cleaner first impression while still keeping navigation accessible later.
5. Hide on Scroll Down, Show on Scroll Up
This technique improves mobile UX significantly by:
- Hiding the header when scrolling down
- Revealing it when scrolling up
Best Practices for Divi Sticky Headers
A sticky header can improve or ruin the UX, depending on how you implement it. Here are some practical guidelines based on real usage:
- Keep the header height minimal to avoid covering content
- Avoid overcrowding with too many elements
- Use clear and visible CTA buttons
- Test responsiveness across devices
- Optimize performance to prevent layout shifts.
A good sticky header should feel natural and helpful, not intrusive.
Common Divi Sticky Header Issues (And How to Fix Them)
1. Sticky Header Not Working
If your Divi fixed header is not sticking:
- Check if the sticky option is enabled
- Ensure parent containers don’t use overflow: hidden
- Disable conflicting plugins
2. Header Overlapping Content
This happens when spacing isn’t handled correctly. Fix it by:
- Adding top padding to the page
- Adjusting header height
- Using proper section spacing
3. Z-Index Problems
If your header appears behind elements:
- Use a higher z-index value to bring it forward.
4. Sticky Header Issues on Mobile
Sometimes sticky headers don’t behave well on smaller screens. Here are the best fixes:
- Reduce header height
- Disable sticky on mobile if needed
- Simplify menu structure
Creating Sticky Header In Divi – FAQ
1. How Do I Add A Sticky Header In Divi Theme?
The Sticky header is a default feature of the Divi theme. i.e., it is enabled by default. However, if you create a new header, you can follow my guidelines or watch the video tutorial to make the Divi header sticky or fixed as you scroll.
2. Is it possible to make a custom header sticky in Divi?
Yes! You can make your designed header sticky in the Divi theme without adding any CSS code. It is a simple process, and no experience is required.
3. How do you disable the fixed header in Divi?
It’s just a reverse process. Go to Header Settings > Advanced > Scroll Effects > Sticky Position > Do Not Stick.
4. When should you use the “Fixed Navigation Bar” setting?
If you use the default Divi menu, please ensure the Fixed Navigation Bar is enabled so the Sticky header works. Look at the screenshot below!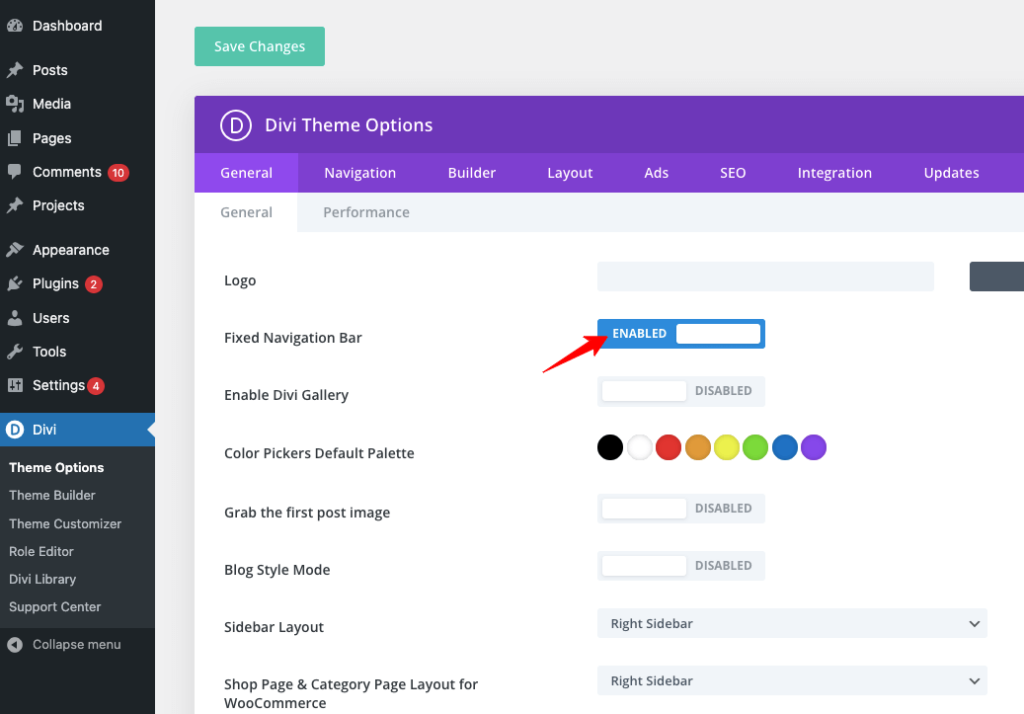
Does a Sticky Header Help SEO?
A sticky header is not a direct ranking factor, but it improves several important signals, such as user engagement, Time on site, Navigation efficiency, and Bounce rate. Search engines prioritize websites that offer a better user experience. A well-implemented Divi sticky menu contributes to that.
Wrapping Up
In 2020, Elegant Themes introduced Sticky options to paste the elements at different locations to improve user engagement.
So, the sticky elements are always visible when your site audience scrolls down your web pages. I’m sure you will get the benefits discussed earlier in this post.
The Divi sticky Header is enabled by default and stays at the top of the page as you scroll. You can follow this tutorial if you’d like to design a custom header and make it sticky.
Creating a Divi sticky header is easy, but creating an effective one requires thoughtful design and optimization. If you combine:
- Clean structure
- Scroll-based effects
- Conversion-focused elements
you’ll not only improve user experience but also gain an edge over competitors who stick to basic implementations.
I hope you understand my guidelines for making the Divi header sticky. If you need help with Divi customizations, please get in touch in the comments.