For the past few months, I’ve been using the Perfmatters plugin. And I must say it’s the best choice for anyone with a website facing speed-related issues. The plugin has made my website blazing fast; the best part is it’s easy to use.
I wouldn’t say I like coding and difficult settings, and the Perfmatters plugin has solved this issue for life. It features a simple setting dashboard, where you only have to toggle on the necessary functions, and you’re good to go.
So let’s explore more about the plugin below through my guide. I’ll share Perfmatters review of how this plugin helps improve performance. After that, I’ll discuss the best features to help you decide whether you need Perfmatters.
Disclosure: We get a commission when you buy a product via our affiliate link at no additional cost.
Table Of Contents
Perfmatters Plugin – A Quick Overview
Perfmatters is a WordPress plugin designed to optimize website performance by improving page loading times and server resource usage and enhancing overall user experience. It’s packed with functions that increase the Core Web Vital score, eventually boosting website speed.
It’s an all-in-one performance optimization plugin that caches the website, optimizes the database and images, has a built-in script manager, can change WordPress login URLs, and supports CDN.
What’s best about it is it’s super easy to install and set up. The pricing plan is also affordable, but if you think it’s high, it’s worth it. You’ll be able to save time, and the website will work better and have a fast loading speed, which is essential for a good user experience.
How Have Perfmatters Boosted My Site Speed?
My website was slow before using the Perfmatters plugin, taking time to load the web page. I tried different SEO hacks, like optimizing the database and removing extra plugins, but doing everything manually was time-consuming.
Then I chose Perfmatters and boom; the problem was solved! I enabled functions like database optimization, lazy load, organizing scripts, defer JavaScript, removing unused CSS, etc. These functions helped a lot and became a game-changer for my website.
With just a few clicks, I could clean up and optimize my website’s database, resulting in faster and more efficient queries. This not only improved the overall speed but also enhanced the responsiveness of my site.
Aside from that, lazy loading dramatically reduced the initial load time, allowing visitors to start browsing my site without delay. Other features, like changing the WordPress login URL, etc., have made my website more secure.
Best Features of Perfmatters Plugin
In this Perfmattes review, I would like to consolidate the best features of this WordPress plugin built for speed. These features can make anyone’s website blazing fast without affecting the website badly. Along with the features, I’ll also discuss how you can enable them, so let’s get into the details!
1. Easy-To-Use Toggle Settings
I want to start with the “General” of the Perfmatters plugin. You have to select the “Perfmatters Plugin” among the options of the WordPress dashboard. After selecting it, you’ll see the functions like the image below.
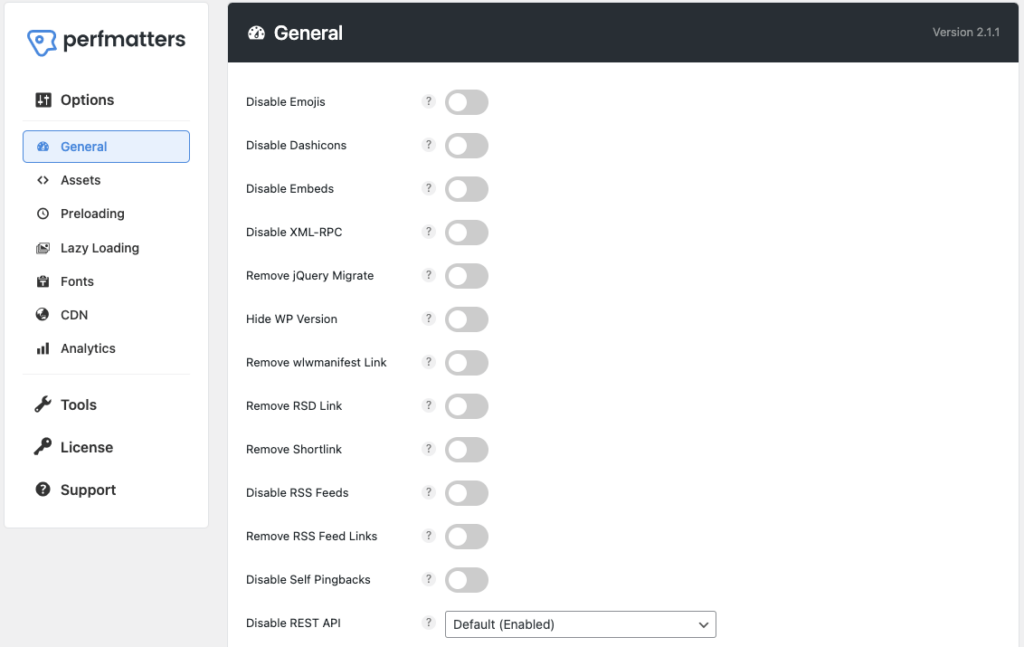
These functions can be enabled or disabled easily by toggling on the setting, which makes it a good option for beginners as it’s easy to use. Remember, it’s not important to enable all settings, only enable functions that are important to you.
- The first four functions are “Disable emojis, dash icons, embeds, XML-RPC,” allowing you to remove emojis and dash icons, which is one reason the website loads slowly. You may also stop the preview of embedded videos and disable the XML-RPC.
- The “Remove jQuery Migrate” option removes the unnecessary scripts of jQuery that slow down the website. While the next “Hide WP Version” feature is related to security as it hides the current WP version from hackers.
- “Removing RSD links, short links, RSS feed links” are also important. Turn on the RSD and RSS feed links. “Remove Shortlinks” functions should be disabled because most website owners use a “post-name” permalink structure to target keywords.
- “Disable RSS feed and Self Pingbacks” are a personal decision. Turn it on if your website has no blog and you don’t want to notify users about your latest blog post. Otherwise, it’s better to leave it disabled. The same goes for Self Pingbacks. It’s a helpful feature but doesn’t add much value and can even create unnecessary clutter in your comments section.
- In the “Disabling the REST API,” you’ll get three options. Select disable when logging out to hide usernames and enhance security. The “REST API links” option removes the unnecessary code generated by the REST API.
- The “Disable Google Maps” option is also a personal decision. Some websites need a map to show the location. In this case, don’t turn it on, while if you have a simple blog, it’s unnecessary, so you may enable it.
- The other options are related to comments “Disabling Comments,” which I don’t think anyone wants to do. However, you should enable the “Remove comment URL” to remove spam comments.
- The “Add Blank Favicon” setting is good for those who don’t have a favicon on their site. If you already have a favicon, it’s not an important setting. While with “Remove Global Styles,” you can remove additional inline codes.
- The “Heartbeat” feature greatly increases CPU usage, so it’s better to limit it to “Allow only when editing posts/pages.” After limiting, set the heartbeat frequency to 60 seconds among all options.
- The “Limit Post Revision” feature is good for the backups of old posts, but limit it to 4 to 5 old blog posts. This way, you’ll be able to optimize your WordPress database. Then save the “Autosave interval” to 5 minutes.
- Lastly, you can use the “Log In URL” function to add a custom WordPress site URL to protect it from hackers. After changing the WordPress URL, it will be difficult for someone to log in to your website.
2. Assets Options
After the general settings, you’ll see the option “Assets” below. It’s all about the script manager, deferring or delaying Javascript, or adding additional code to the website’s header, body, or footer section.
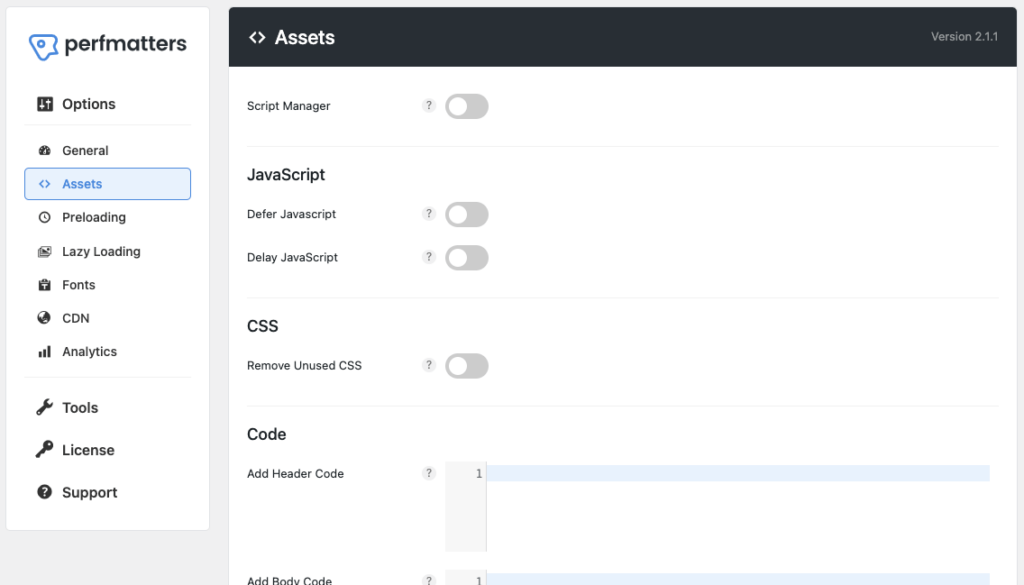
Always turn on the “Script Manager” functions. It removes unused CSS or Javascript files that web pages include. It makes the website load faster because the more code you have, the more time the browser will take.
Beneath the Script managers, you’ll see the options “Defer Javascript” and “Delay Javascript.” Both are important, and you should enable them; they allow the critical content of the page to load first, improving the overall performance.
The “Remove unused CSS” improves website load speed. CSS files can be large, especially if they contain unused or redundant styles. Removing them can reduce the file size, resulting in faster loading times for your web pages.
Finally, you can add code by using the “Code” settings. If you want to add more code to the header, add it to the header code section. While for the body and footer, add code in the “Add body or footer code” option.
3. Pre Loading
The third category in the settings is “Preloading.” Here you’ll find settings like “Enable Instant Pages,” “Preload,” “Pre Load Critical Images,” etc. With these features, you’ll be able to preload web pages, automatically boosting your website loading speed.

The first option is “Enable Instant Page.” This function allows the browser to prefetch and prerender web pages in the background so that when a user clicks on a link, the page appears to load instantly.
The second option is the “Preload.” It allows you to specify the resources you wish to load first. For example, when you click the “Select type” option, you can choose images, fonts, videos, etc. Besides that, you may also choose the device type.
Then comes the “Preload Crticial Images” setting. It’s a technique to prioritize loading essential or critical images on a webpage. You can select any number between 0 – 5, but I suggest 2 to 3 settings.
The “Preconnect” settings allow you to interact with the website early. When a user visits a page with the plugin, the browser detects the pre-connect instructions and establishes early connections to the specified domains.
By implementing “DNS Prefetch” in the WordPress Perfmatters plugin, you can reduce the latency caused by DNS lookups. It’ll result in improved website performance and faster loading of external resources.
4. Lazy Loading For Visual Content
Lazy loading is an important part of optimizing visual content. It helps optimize the loading speed and performance, particularly when dealing with content-heavy websites that include many images, videos, or other media elements.
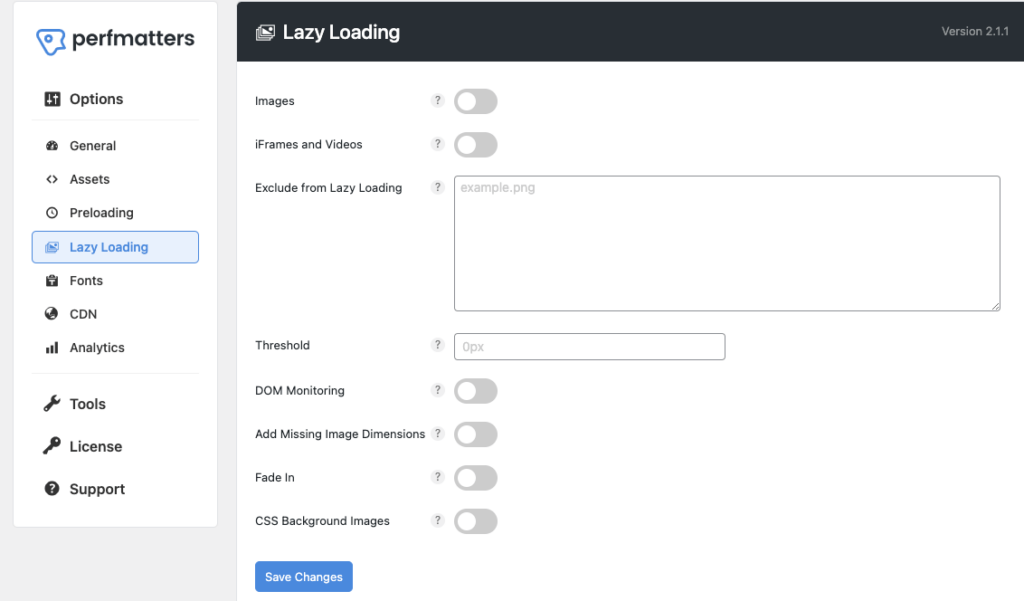
It’s a simple technique that defers loading non-critical resources (unnecessary images, videos) until needed, rather than loading them all at once when the page initially loads.
“Images” is the first setting of the Lazy load. By enabling this feature, all images on your website will load when needed.
After images, the next option is “iFrames and Videos.” it’s a similar function to the images; the only difference is it lazyloads videos and iFrames.
The third option is “Exclude from lazy loading.” You can add the URL of the images and videos you would like to exclude from lazy loading.
As part of lazy loading, the “Threshold” option is a parameter that determines when to trigger the loading of lazy-loaded content. You have the option to increase it above 0px for better results.
The next two options are “DOM monitoring” and “Add missing image dimensions.” turn on DOM monitoring if you use infinite scrolling. The second option is important if you want to add dimensions to images. In case you don’t want this feature, leave it disabled.
The “Fade in” option gives a fade-in effect, and the last “CSS background images” settings ensure the lazy loading of background images of your website. I suggest you enable both options, particularly the “CSS background images.”
5. Fonts Settings
Fonts settings of the Perfmatters allow you to host Google fonts locally, display swap and disable or enable Google fonts from your website. You’re free to decide which option you should enable, but here are my suggestions:
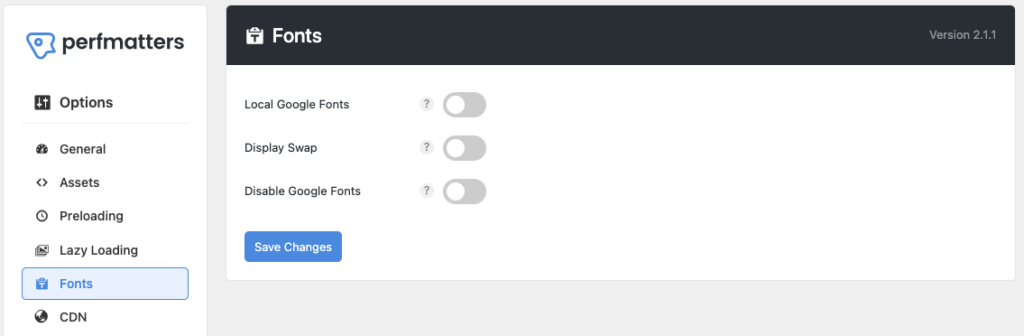
Turn on the “Local Google Fonts” settings, but before you do that, ensure to download Google fonts.
“Display swap” is a font loading strategy introduced by Google Fonts to enhance the user experience when using web fonts. This is why I always enable this function.
The third function is “Disable Google fonts.” Only enable this option if you must remove Google fonts entirely from your site.
6. Supports CDN
I should have a word about the CDN service in my Perfmatters review! Thanks to this service, we can quickly access content from any corner of the world because geographically distributed servers enable quick content delivery. The thing I like about Perfmatters is it supports CDN service.
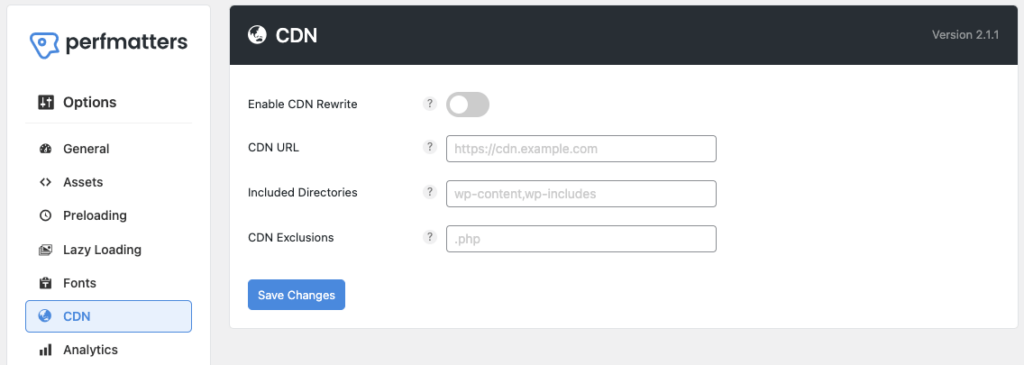
The “Enable CDN Rewrite” option will change your site URL to CDN URL to ensure your assets load from the CDN network instead of your server making the website faster.
In the next settings of “CDN URL,” you can add the URL of your CDN.
If you want to add any additional directories to your CDN, add them in the settings of “Included Directories.”
The “CDN Exclusions” option excludes specific files or directories from CDN rewriting.
7. Host Google Analytics Locally
Hosting the analytics tracking script or code on your server instead of relying on the external servers provided by Google is a good practice. It not only improved performance but also made the website data more secure.
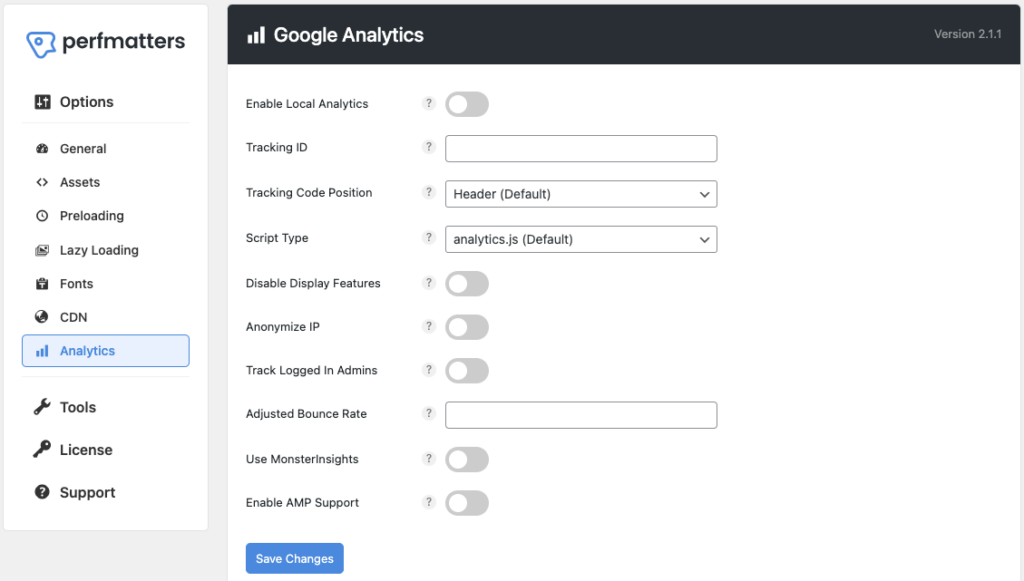
The “Enable Local Analytics” option helps keep our website information private by hosting it.
“Tracking ID,” here you need to add your Google Analytics tracking ID.
The “Tracking Code Position” option allows you to load the analytics code in the header or the footer.
In the “Script type” settings, you’ll get multiple options to choose the script file type. I think analytics.js or minimal is best because they’re smaller than others.
Enable the “Track Logged In Admin” only if you like to get your admin access to the Google Analytics data.
8. Database Optimization
Here comes the last category of Perfmatter settings, “Database Optimization.” If we do the same work, it means optimization of the database manually will take a lot of time, but with Perfmatters, it only takes a few moments, and you may also schedule it.
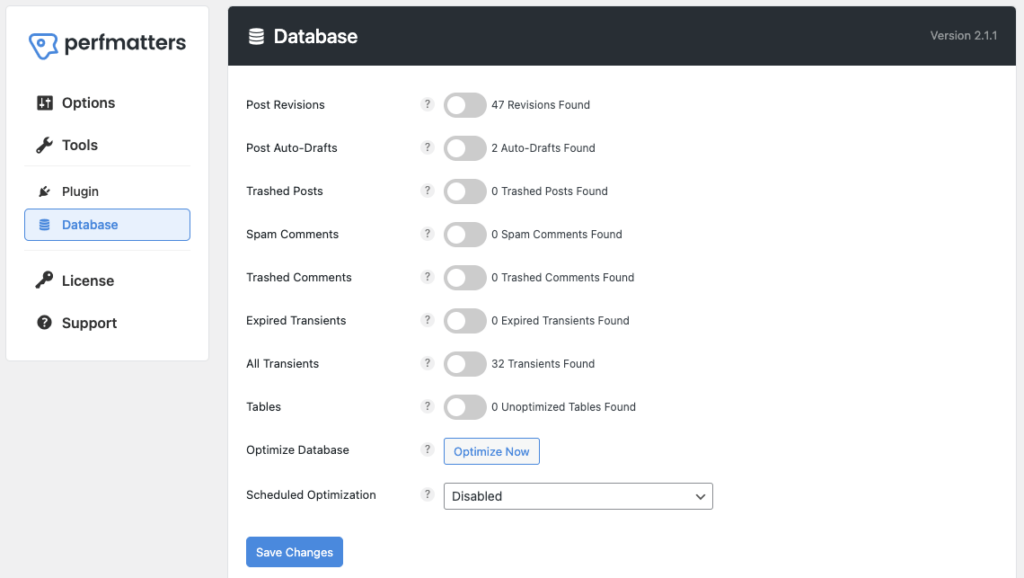
As you can see, there are options like “Post Revisions,” “Post Auto Updates,” “Trashed Posts,” etc. I’ve 47 “Post revisions” shown beside the toggle button. If I enable this post-revision setting and click “Optimize Now,” the data will be deleted.
In short, you must check what you want to include in “database optimization.” You can enable “Post-auto-drafts,” “Trashed Comments,” “Expired Transients,” and so forth. After enabling the option, decide whether to optimize now or schedule.
If you want to optimize your WordPress database, click the “Optimize Now” option. Otherwise, you can see the “Scheduled Optimization” settings and select daily, weekly, or monthly for scheduling.
Perfmatters Plugin – Frequently Asked Questions (FAQs)
Is Perfmatters Plugin free?
No, Perfmatters isn’t a free plugin; it’s paid. It comes with three paid plans: Personal, which costs $24.95 yearly for one website; business plan costs $54.95 yearly; it’s suitable for three websites. Lastly, the Unlimited plans for unlimited sites are $124.95 yearly.
Conclusion
Here is my Perfmatters review! This WordPress performance plugin impressed me with its remarkable features and optimizations. It’s an all-in-one performance plugin that simplifies my blogging journey by automating tasks like database optimization.
The only thing that remains for you is to choose the features you want to enable. Remember, enabling all functions I’ve suggested above is not important. You can make your own decision by experimenting with what suits your website.