So, do you want to learn, how to implement the WordPress Block IP and restrict the access of your site from specific users?
If yes, just read on the easy ways to do it!
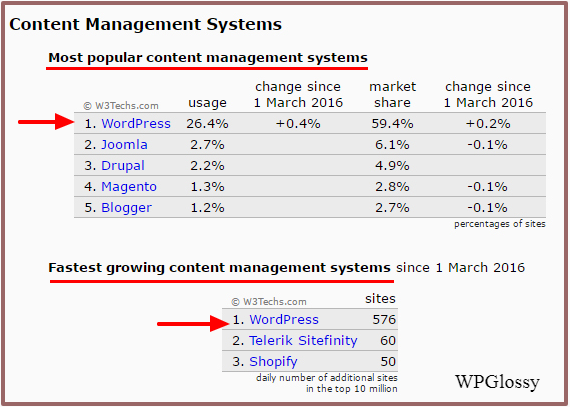
WordPress is undoubtedly the most popular CMS platform on the planet, but its popularity also makes it an easy target for hackers.
Today, more than 27% of all the websites globally run on WordPress platform. This is the very reason that hackers target this particular platform more than any other.
According to Forbes, WordPress may eat the internet in the future!
Being an open-source platform, hackers can also easily trace WordPress vulnerabilities, and if you have an excellent money-making web property by using this content management system, then you’re also in trouble.
While the whole WordPress community is always working towards developing a better, advanced, and secure platform, hackers are also upgrading themselves.
Once your business site grows, you might start receiving a password reset option on the registered email. It suggests that someone is trying to get access to your WordPress dashboard.
So, if you suspect someone tried to take control of your WP site, then do you know how to block a user in WordPress?
Don’t panic! There is a right solution for every problem 🙂
If you have doubts about the security of your website, you should take a look at advanced WordPress security strategies, where I discuss improved ways to protect your site.
Now, let’s get into the topic!
So, you want to execute the WordPress block IP after failed login attempts?
I’m going to tell you several ways to do the WordPress IP ban, and let me start with the basics!
Disclosure: We get a commission when you buy a product via our affiliate link at no additional cost.
Table Of Contents
What’s an IP address?
An IP address is the location of the computer connected to the Internet. The whole internet is classified and separated based on these IP addresses.
Whenever a malicious attempt or hacking attempt is made on your blog, you can block such attempts in the future by blocking that particular IP address.
However, IP addresses can be masked today using VPN services.
Possible Reasons For Denying The WordPress IP
There are many reasons for denying certain IP access!
# Random hacking attempts and DDOS attacks
# Spam through comments
# Undesirable guests or Unwanted traffic
# Malicious bots and spiders
# Your Site is under construction
How To Find The IP Address You Want To Block?
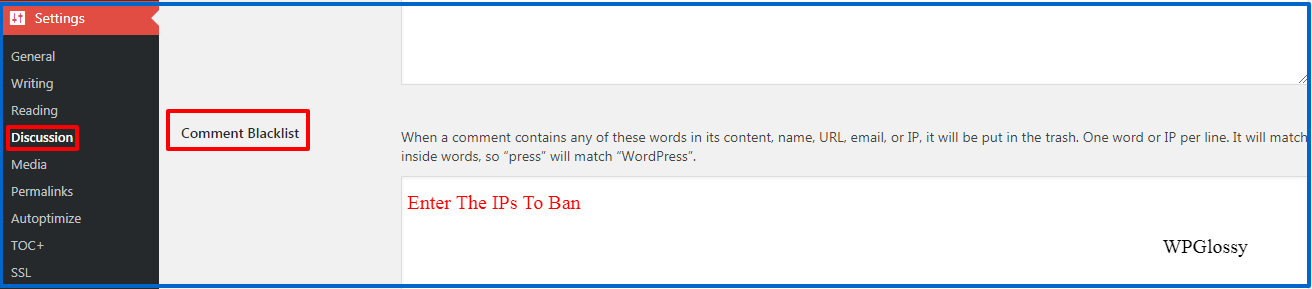
If the malicious attacks are tried in the form of comment spam, you can find the IP address from your comment section itself. Each comment mentions the IP address from which it was submitted.
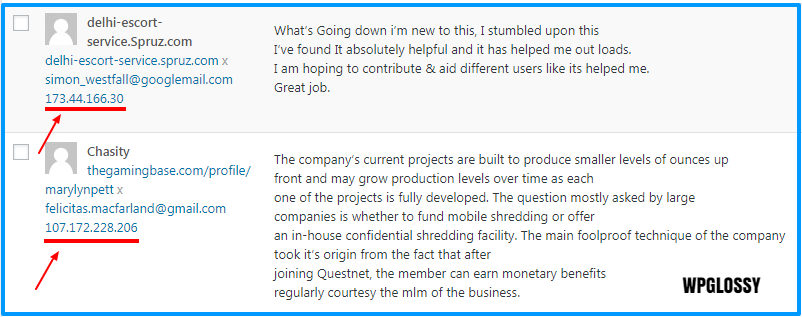
Now, you may go to the WordPress Dashboard > Settings > Discussion > Comment Backlist to restrict comments from that IP address.
In addition to that, each web hosting service provider creates access logs by default. It keeps a record of each IP address accessing your blog or website.
Visit the cPanel of your hosting service and locate “Raw Access Logs” (the access file name may vary with the hosting provider)

Now, you will get the Archived logs to download. Open the file and check whether someone has tried to access your WordPress Admin or Login page.
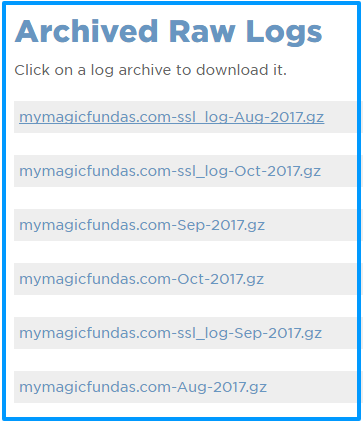
You may use CTRL + F to search wp-admin or wp-login!
If your WordPress blog is under a DDOS attack, you can easily trace down the IP addresses based on your server logs.
However, the server logs will list down every IP address accessing your WordPress site. The logs would also contain legit users, Google bots, etc.
Hence, it is essential to note down the suspicious IP addresses based on their access files and perform a background check on them using IP Lookup Tools.
You must be very careful before blacklisting these IP addresses as you must ensure that none of your legit users or search engines are blocked accidentally.
To ease things further, I strictly recommend using the Limit Login Attempts plugin on all your WordPress sites. It’s free and allows you to set a limit on login attempts.
Best Ways to Perform WordPress Block IP
Check the several ways to ban IP addresses in WordPress and use the suitable one!
Use The Limit Login Attempts Plugin
When a registered user tries to log in, he/she wouldn’t require more than two attempts or a maximum of three attempts.
Set the attempts to three using the Limit Login Attempts plugin, and every time someone tries to make the fourth attempt, they will be blocked automatically for some time.
Having such a plugin would also prevent any brute-force attack on your WordPress site. By default, WordPress allows unlimited login attempts irrespective of whether the effort is made using the login page or special cookies.
Such negligence makes any WordPress vulnerable to a brute-force attack used to crack the password.
Hence, it is important to install the Limit Login Attempts plugin right away. The plugin also lets you whitelist several IPs for the registered users if they are using a dedicated IP address from their ISP.
While I recommend the Limit Login Attempts plugin, there are several other plugins too that can come in handy, as not all hacking efforts are made via login attempts.
Top 2 WordPress Plugins To Block IP Address
Once you have the list of malicious users, you can use some readymade plugins to block IP address in WordPress that tries to access your blog or site, not just the login page.
Here you go!
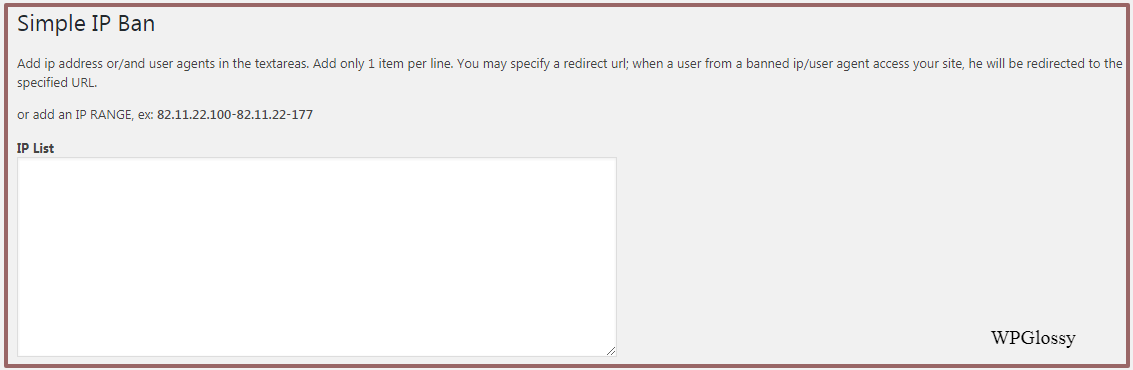
1. Simple IP Ban
Simple IP Ban, as the name suggests, is the simple tool that enables your blog to blacklist selected IPs. In addition to the IPs, the plugin will also allow you to ban certain user agents from accessing your WordPress website.
In addition to the IPs, the plugin will also allow you to ban certain user agents from accessing your WordPress website.
Banning user agents will protect your site from unnecessary bots and disallow them from accessing your blog. It will also reduce the server load as these crawlers use your server resources and bandwidth.
It will also reduce the server load as these crawlers use your server resources and bandwidth.
How To Use IP Ban?
Step 1: Simply install the plugin from the WordPress repository.
Step 2: Activate the plugin.
Step 3: After activating the plugin, you will find Simple IP Ban listed among the other options under the “Settings” section on your WP Admin dashboard.
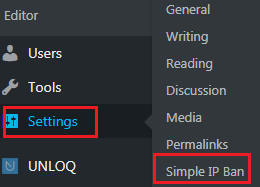
Step 4: You can find options to ban IPs, User Agents, and other settings.
2. WP-Ban
WP-Ban is a little bit advanced version of Simple IP Ban!
It not only allows you to ban certain list of IPs but also lets you ban an entire IP range (i.e., if you want to block a particular ISP).
You can also whitelist certain IPs you don’t wish to ban. The plugin itself will display the message notifying the user about the ban whenever the user tries to access the blog.
The plugin itself will display the message notifying the user about the ban whenever the user tries to access the blog.
You can also monitor the number of attempts made to visit your blog using the statistics logged by the plugin. It also displays your details to ensure that you don’t ban yourself in the process.
It also displays your details to ensure that you don’t ban yourself in the process.
How To Use WP-Ban?
Step 1: Simply install and activate the WP-Ban plugin from the WordPress repository.
Step 2: You will find the options for this WordPress IP blocker under “Settings” on your WP Admin dashboard.
Step 3: From the settings page of WP-Ban, you can choose to list the IPs you want to ban or select the IP range based on your preferences. You can also set the custom message for the banned users.
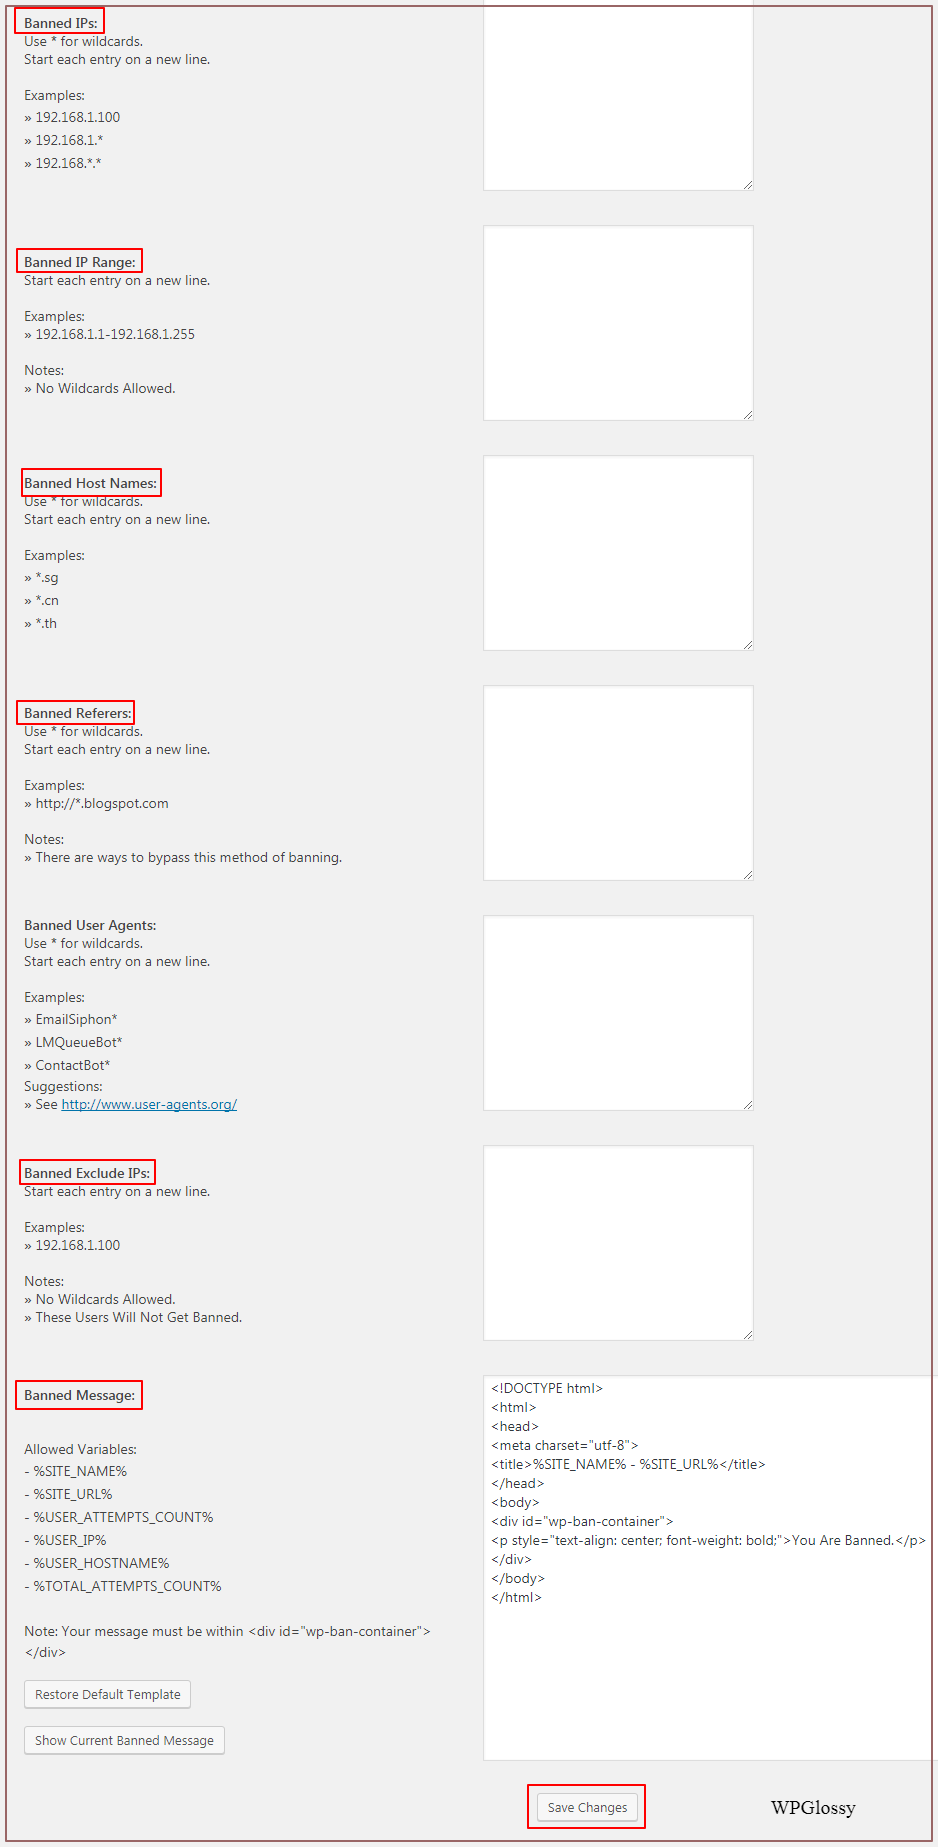
Step 4: Once all the options are set, simply click “Save Changes” to get things started.
Other Recommended Plugins To Blacklist IP In WordPress
1. Wordfence Security
Wordfence Security works as a firewall between malicious hacking attempts and your blog. It keeps your blog secured from any suspicious access as well as tracks down any recent changes to your files.
You can set a scheduled scan for your blog and configure firewall settings to keep your blog safe and secure all the time.
It will also monitor and give you detailed information about failed login attempts on your blog. You can choose to ban such IPs easily from the Wordfence control panel or ignore them.
Under the options setting, you can find a variety of different preferences for WordPress block IP addresses based on their login attempts. It is straightforward to use and ensure complete security to your blog.
Although enough, there are only limited features in the free version of this plugin. You can upgrade to unlock all the premium features.
2. Shield Security
Shield Security is another similar plugin to Wordfence that offers complete protection for your WordPress site. While Akismet does a great job, you must try Shield Security to block automated spambot comments.
It is one of the best security plugins for WordPress that also helps you hide the login and WP admin page so that nobody can try a brute-force attack on your blog via bot logins.
Similar to Wordfence, Shield Security also enables two-factor authentication for better security. It automatically monitors login activity to trace any hacking attempt as well as restrict username sharing to avoid brute-force attacks.
The only feature that keeps Shield Security a step ahead of Wordfence is the Super Admin Security Protection feature.
This feature will protect the Shield Security settings, and only someone with admin privileges, as well as the authentication key, will be allowed to access the plugin settings fully.
In addition to all these settings, you also get the option to block IPs. Hence, it can act as a good WordPress IP Blocker.
How To Do WordPress IP Block Without a Plugin?
While using a WordPress plugin is the best way to block any IP from accessing your blog, there are chances that the plugin may become outdated, incompatible, or corrupted.
Also, it’s better to use a limited number of add-ons to speed up your site’s load time!
Here are a couple of ways to block IP address in WordPress without plugins:
1. Using .htaccess
Well, adding few lines on your blog’s .htaccess file can block IP addresses from accessing the WordPress admin dashboard.
You can do this by adding the following lines to the .htaccess file. You can edit the file using SEO by Yoast Plugin, SEO > Tools > File Editor
Here’s the code!
a. To restrict one particular IP in WordPress
<Limit GET POST>
 order allow,deny
 deny from 36.228.47.114
 allow from all
 </Limit>
Note:
Replace the IP address, 36.228.47.114, with the IP of the visitor you want to block. I have written it, for example, so make sure to change it.
b. To prevent all IPs in WordPress
If your site is under construction and you don’t want to allow the readers to access it, then you may use the code below.
<Limit GET POST>
 order allow,deny
 deny from all
 # Just Allow a Single IP
 allow from 74.89.61.164
 </Limit>
Here 74.89.61.164 is your IP.
c. To do multiple WordPress ban IP, list them one per line
<Limit GET POST>
 order allow,deny
 deny from 36.228.47.114
 deny from 36.225.88.50
 allow from all
 </Limit>
d. To block a range of WordPress IPs, enter the IP without specifying the last octet
<Limit GET POST>
 order allow,deny
 deny from 136.0.0
 allow from all
 </Limit>
So, all the users in the range 136.0.0.0 to 136.0.0.255 will be blocked.
Use the .httacess file editing method to ban WordPress IP only if you are completely sure. I would recommend relying on the plugins as they are simple to use and implement.
2. Via cPanel of the Web Hosting
If you are using a Shared Web Host, then you must have access to your hosting cPanel. You can also block IPs from the options given within your cPanel settings.
Login to your cPanel and you will find IP Address Deny Manager or IP Blocker setting under “Security” section.
Open it, and you will find the fields to add an IP address you wish to block. To unblock any IP, you can visit the same page.
Note: I’m using HostGator Cloud Hosting for WordPress!
Over to you!
As the functionalities of WordPress are getting extended through third parties, we must keep the security holes at bay!
There’s no way a hacker could log into the WordPress dashboard without the right password. However, that’s not going to stop his/her attempts.
Hence, it is advisable to deny the IP addresses of the users trying to access your dashboard without your knowledge. Yes, you have to block the malicious WordPress visitors by their IP address!
I hope you are now aware of the different methods for WordPress to block IP addresses and secure your site from intruders.
If you are using any other techniques to ban people from the WordPress site, then please share those in the comment section!


Nice information for WordPress security but, why you don’t use AdSense on your blog?
very usefull Article . thankx
Even I have a WordPress site or I understand how difficult and important its keep your blog or site safe. Thanks for sharing such wonderful information.
Great blog mam..!!
learn new thing in WP about how to restrict spammers. I will definitely use this whenever it’s needed.
Thank you.
Great post! Thanks for sharing in so much detail.