Table Of Contents
I have received a number of requests to write something that helps to move a WordPress site to another host.
Today, I will guide how you can easily migrate a WordPress site on your own so that you don’t need to depend on the tech support to move your site to new host.
Well! I have been asked to answer several questions like
How Do I Migrate WordPress Site On My Own?
Can I move my WordPress site to another host?
How to transfer from one WordPress site to another?
Which is the best free WordPress migration plugin?
How to do WordPress site migration for free?
And a few more!
I assume you have chosen the new web host considering this checklist.
WordPress Migration – You might think that this is a complication procedure and cannot do on your own.
If you think so, you’re wrong!
Yes! Things have changed, and even a non-tech savvy guy can do the WordPress migration on his own.
Wondering?
Let me tell you how though this post.
2 Ways To Do WordPress Site Migration On Your Own

This guide is divided into two methods.
- Migrate WordPress Using a Plugin [The Easiest Way]
- Migrate WordPress Manually [The Fastest Way With Cloudways]
Let’s start with the first one.
1. Migrate WordPress Using A Plugin
WordPress repository has several migration plugins; it’s hard to choose the WordPress migration plugin that fulfils your requirements.
In my opinion, the best free WordPress migration plugins are:
I will use All in One WP Migration plugin for this guide.
Login to your WordPress dashboard on the old WordPress hosting provider. Navigate to Plugins -> Add New and search for All in One WP Migration.
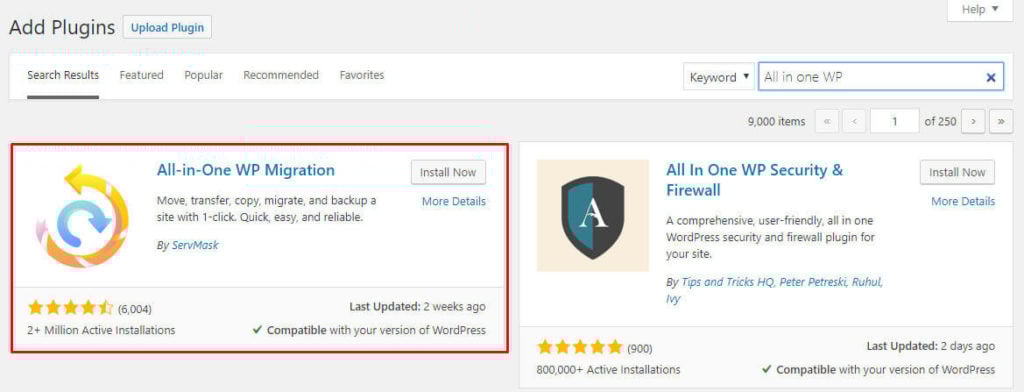
Click on Install Now and then Activate button.
Once activated, you will see All-in-One-WP-Migration in the left menu. Get into the Export tab.
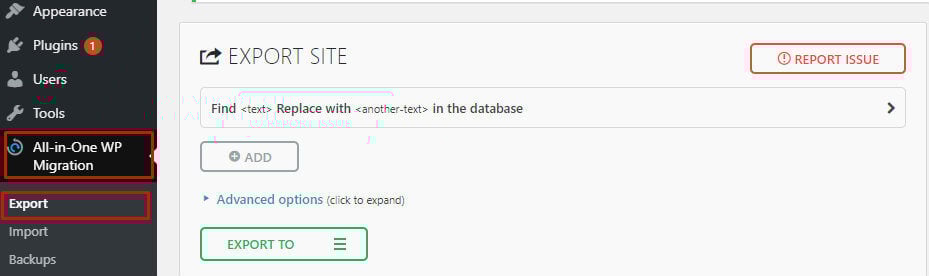
Here, you will have three options:
1. Add: This plugin allows us to replace values in the database. Ignore it for this time.
2. Advanced Options: Expand this option if you do not want to export a few WordPress data like Spam comments, Theme & Plugin files, post revisions, etc. I will leave all boxes unchecked as I want to move my entire WordPress site to another host.
3. Export To: All-in-One-WP-Migration plugin allows you to export data in different formats. Either you want to download a zip file, upload directly to your new hosting provider via FTP or upload files on the cloud-like Google Drive, Dropbox, etc.

I will download the zip file. Expended the “Export to” option and click on File. It will start the process, and after a few minutes (depending on the file size), it will popup and ask to download the Compressed file. Click on it and download the .wpress file.
Now, login to the WordPress dashboard on your new WordPress hosting provider.
Navigate to Plugins -> Add New, Search for All in One WP Migration, and Install and Activate the plugin.
From the left menu, navigate to Import.
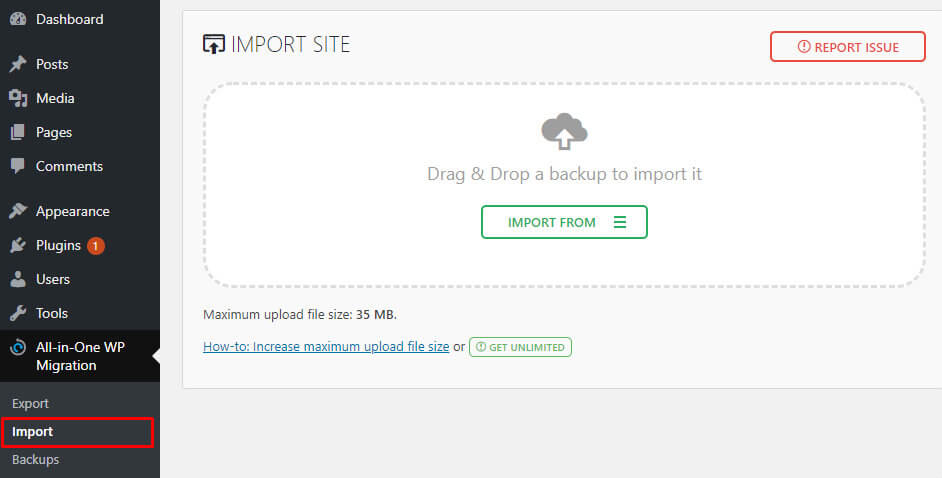
Expend the “Import From” and select the method from the available options. Browse the downloaded .wpress file from your computer.
In our case, it’s a File, as we have exported the WordPress website using the File method previously.
Note:
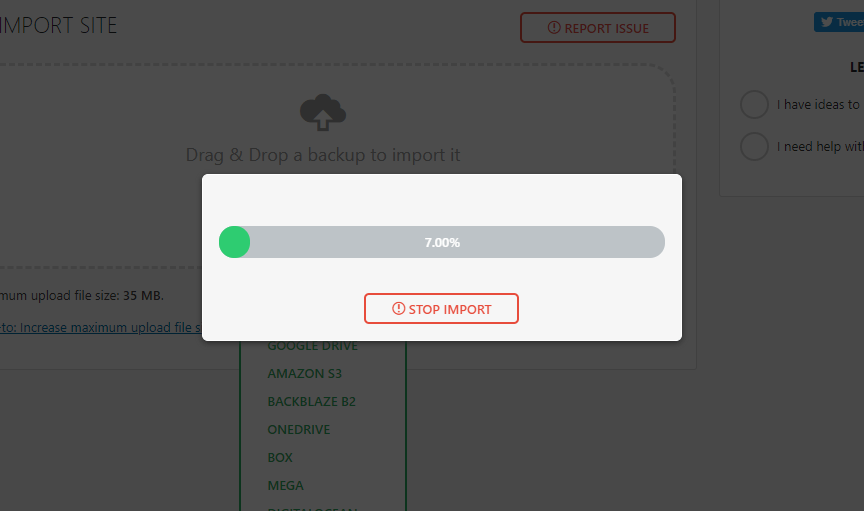
You may get a warning of “Your file exceeds the maximum upload size for this site”. Make sure the maximum upload file size limit is more than your downloaded file size. All in One Migration has an excellent guide to increase file upload size limit.
Some specialized WordPress hosting providers like Cloudways allows you to increase upload file size limit directly from their platform.
Once increased, try uploading the downloaded .wpress file again. The uncompression process will start and take a few moments to migrate WordPress to a new host.
Later on, you may get a warning message like below:
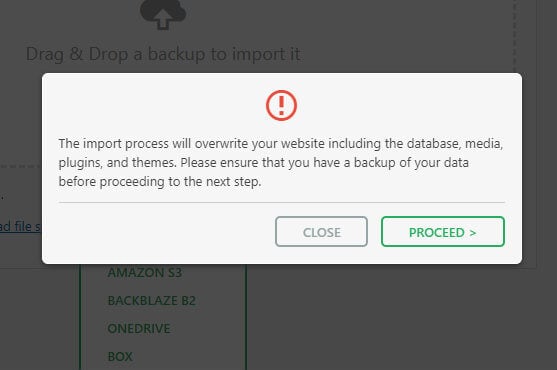
Since the WordPress migration plugin will override everything on the new hosting. Create a backup if you do not want to lose your data of existing WordPress installation on the new hosting.
Click Proceed.
After successful migration, you will get a successful popup.
“Your site has been imported successfully!”
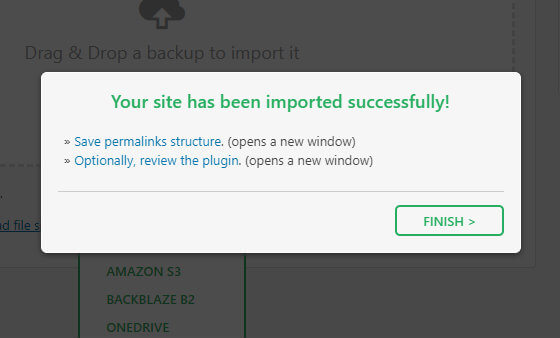
It is always suggested to save permalinks if you are migrating a WordPress site to another host. It will generate a WordPress .htaccess file that is responsible for redirections.
Click on Save Permalink Structure, it will take you to the WordPress login screen.
Login to your WordPress dashboard with the username and password you set on your old hosting provider. It’s because the new database has your old username and password.
Once logged in successfully, set the permalinks and click on the Save Changes button at the bottom.
Hurrah! You have successfully migrated a WordPress website to another host!
2. Migrate WordPress Manually [The Fastest Way]
If you have a large WordPress website, let’s say more than 500MB, even the best WordPress migration plugin may fail. Alternatively, you can migrate a WordPress website manually.
The manual WordPress migration involves a few steps mentioned below:
- Uploading WordPress Files
- WordPress Database Migration
- Tackling The Tricky Bit
- Finalizing The Process
- Settling In
Let’s start with the very first step.
1. Compress WordPress Files
Login to your old WordPress hosting provider, get into the WordPress installation, compress all files and folders by creating a zip file. Assuming you have a cPanel based hosting.

Once compressed, find the zip file and access it via a browser. Let’s say, you have a domain name, abc.com and the zip file is in the main directory so the URL will be like abc.com/xxxxxx.zip
Copy this URL, and we will need it in the next step.
2. Upload WordPress Files To New Hosting
There are two ways to upload the zip file, either download it and then upload using an FTP client like Filezilla [Time-consuming] OR upload it directly using an SSH terminal [The fastest way].
The Filezilla method is pretty straight-forward. I will cover the SSH method here.
Login to your new WordPress hosting provider. Make sure it offers SSH terminal. In my example, I’m using Cloudways that has a built-in SSH terminal.
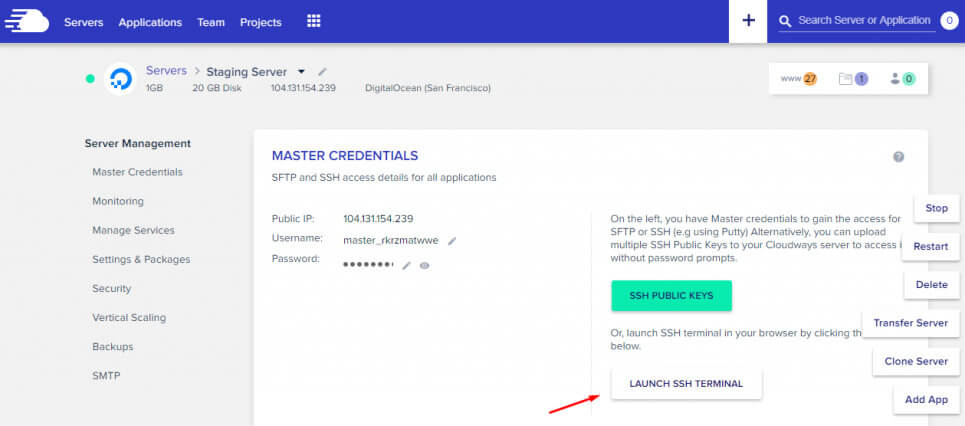
Use Master Credentials to login to the server and then get into your WordPress installation folder using the command:
cd applications/[FOLDER_NAME]/public_html
Here’s how one can get the folder name of an application.
This is where we want to have our migrated WordPress site. First thing first, we need to remove all files and folders in this directory. Use the below command to delete everything.
rm -rf *
Use the below command to download the previously created zip file.
wget URL_OF_ZIP_FILE
Make sure to replace URL_OF_ZIP_FILE with the actual URL. It will take only a few seconds to download the zip file from your previous hosting.
Unzip the downloaded zip file using the below command:
unzip ZIP_FILE_NAME
Do not forget to replace ZIP_FILE_NAME with the file name of your zip file including the .zip extension.
All files and folders will be extracted here.
3. Export & Import Database
After successfully migration of web files, we now need to export the database from the previous hosting provider and import it to our new WordPress hosting provider.
Login to your database manager (phpMyAdmin). Select your WordPress database and navigate to Export.
This will export the database in a .sql file format, download the file.
Log in to the database manager of your new WordPress hosting provider, create a new database, and navigate to Import. On Cloudways, I just have to import the .sql file as the database is already created for me.
Click on Choose File and upload the previously downloaded .sql file.
4. Update WP-Config File
The next step is to connect your WordPress installation with the database. Open the wp-config.php file and replace the values of DB_NAME, DB_USER, and DB_PASSWORD, save and close the file.
Hurrah! You have successfully migrated your WordPress to the new host.
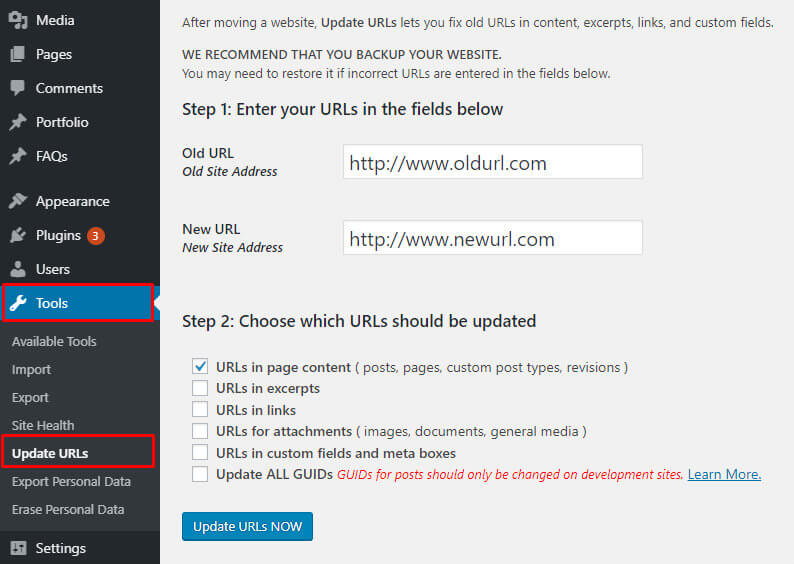
5. Replace URLs Using Velvet Blues Plugin
After migrating a WordPress site to a new host, you might need to replace URLs as well. The easiest way to do this is by using a plugin.
Go to your WordPress dashboard and install and activate the plugin ‘Velvet Blues’
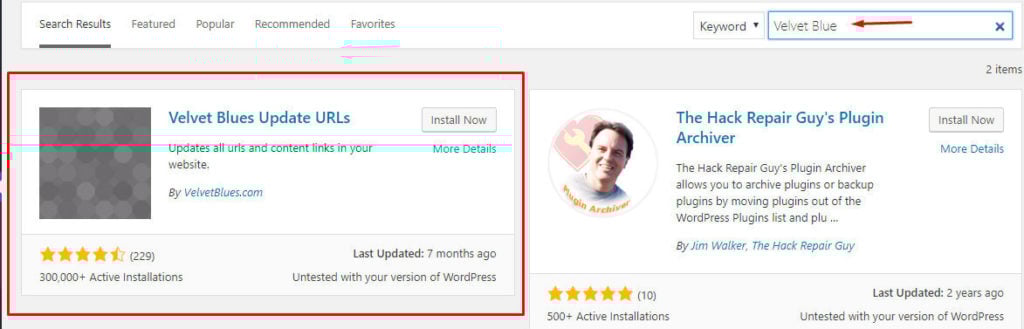
Once the plugin is installed and activated, it can be accessed from the Tools tab. From there, you can replace your old URLs with new URLs.
How Easy Is it To Migrate WordPress To Cloudways?
If your new host is Cloudways [that we are using], then migrating a WordPress site is super easy.
However, if you have decided to go with any other hosting, I suggest you change your decision because you will regret it later if you’re not getting this best cloud hosting for WordPress.
You need to install the free Migrator Plugin developed by Cloudways and define the information of your server and application. Don’t miss our Cloudways Coupon Code to get a price-cut offer.

It is the best WordPress migration plugin, which will take care of the whole file transfer process and notify you once it is completed.
Recently, I moved my WordPress blog to Cloudways with the help of this plugin in 30 minutes. The file-moving process to another host is just a piece of cake with the Cloudways WordPress Migrator plugin.
Let’s see how to do it!
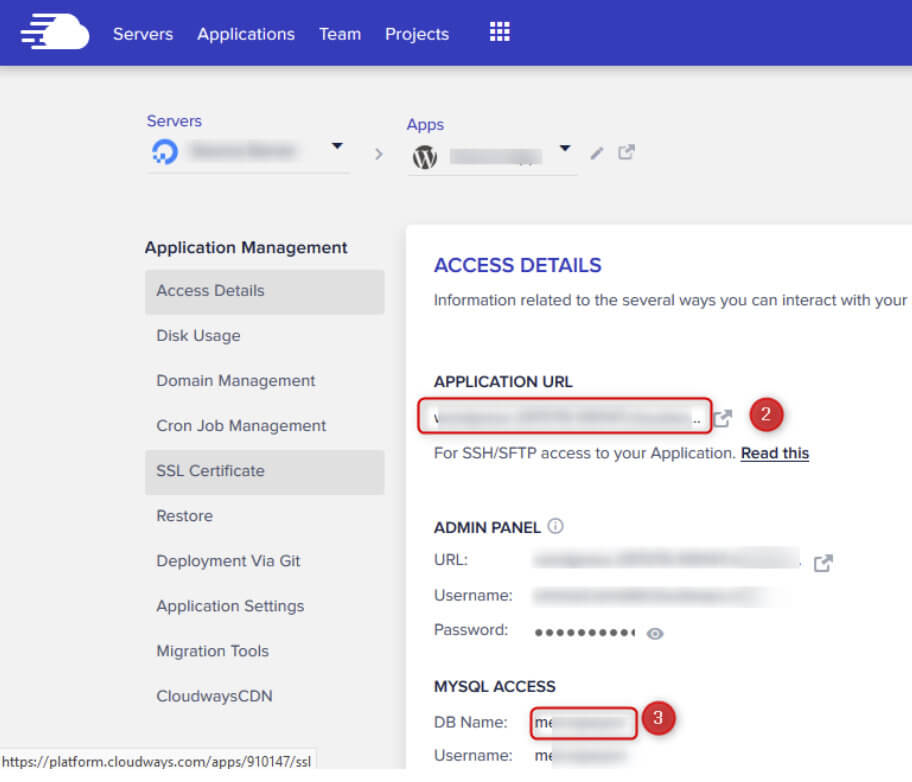
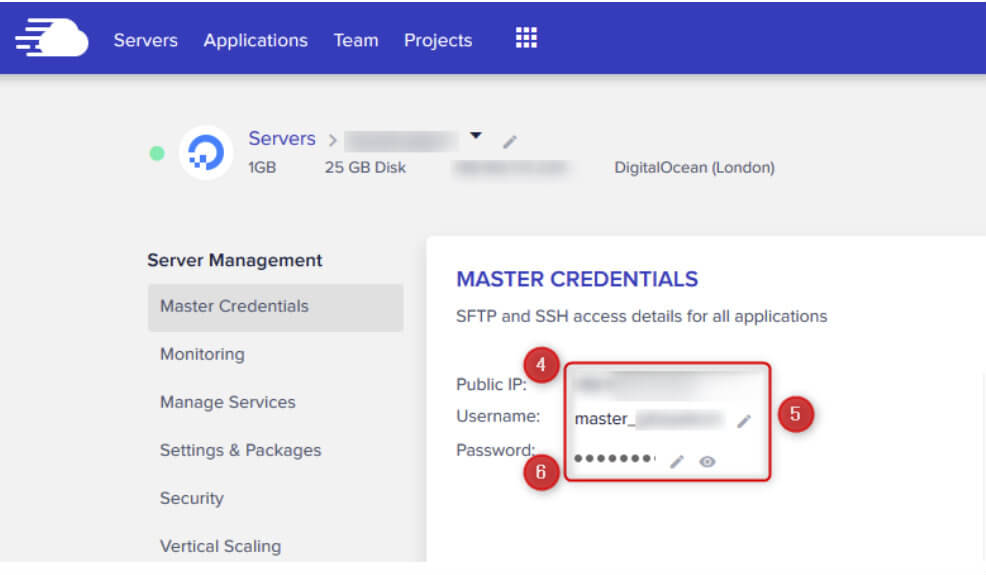
After installing the migration plugin, visit the WordPress Dashboard > Cloudways Migrate and fill in all the necessary details
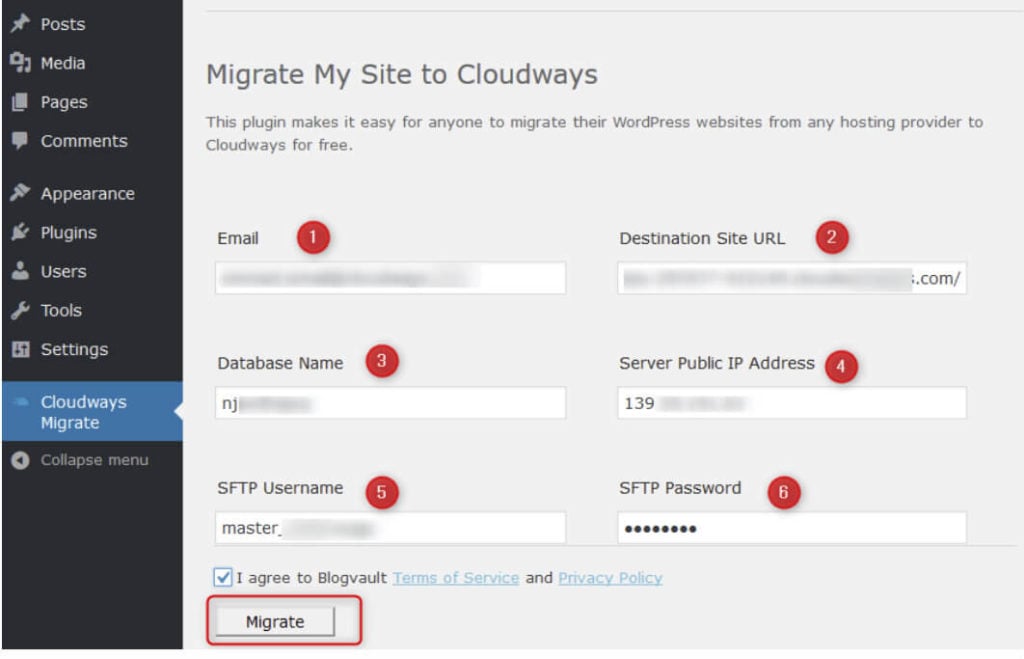
If you struggle to find the information like Destination Site URL, Database Name, Server Public IP Address, SFTP Username, and SFTP Password, then have a look at the below images, so that you can easily get the details to fill in the migrator plugin.
When you hit the “Migrate” button, the file transfer will begin with the help of Blogvalut, and you will be notified once the migration process is over.
My Conclusion About WordPress Site Migration
Getting migration assistance from the hosting support team is a painful task!
Moreover, if they offer free migration, you must wait a long time as they always work on a priority basis by keeping the free transfer requests at the bottom of their list.
So, if you want to do the WordPress Site Migration on your own without relying on the tech team of your web host, then you should use the right plugin to get the job done.
Believe me! It is the simplest WordPress migration technique; everyone can do it without stress or complications. I have done the same process twice and hence recommend it to you!
Which method would you like to go for your WordPress site migration? Which plugin do you prefer? What do you think about Cloudways and its easiness?
thaks for your information i am wordpress user so this website is really made for me . I am going to bookmark it
Great post thanks for posting such valuable information with us. As there are many hosting sites out there so in the first try you might choose a bad one and build a whole WP site on it but later have to change the hosting, so here your post provides a great deal of information to do so. The way you’ve elaborated the whole process with such relevant screenshots is amazing. It will help a lot of people in changing their website hosting without designing it over. Good work keep it up.
I will use plugin method because its easy to get backup and also to restore. thank you very much you saved my time.
Thanks for the info. Wp migration has always been a problem for me.
Go with Cloudways, There are just awesome!
Wow I love this, it’s informative and we’ll detailed, I can now migrate my WordPress site, thanks a lot
Can you please recommend me the fastest web hosting?
Get Cloudways! It is the fastest hosting!
If you’re a beginner who doesn’t have a clue about technical stuff like migration, you should definitely avoid migrating on your own.
It’s always better to find a host that offers free site transfers as they often have technical teams to do the migration for you effortlessly.
Although there are some plugins and a ton of tutorials on YouTube on how to do the migration but to stay on the safer side, find a host that offers free transfers.
This is a great guide on how to migrate WordPress to another host. The process is fairly simple and it walks you through the steps you need to take to ensure a smooth transition.
It’s Very helpful content for migrating WordPress Site to another host.
Thanks
Can you suggest me which one is best for Micro Niche Website Hosting ?
Go with Cloudways DigitalOcean server. You will never be disappointed!