In this blog article, I will explain how to create contact form in Divi theme through step-by-step instructions. I have also captured a video tutorial to make a Divi contact form for an example so that you will quickly understand. Let’s get into the topic.
A basic site on WordPress contains home, about, contact, and disclaimer pages. While you can create most pages easily since they are only textual, creating a contact form is a hassle. You must embed a form and configure the email to ensure every message reaches your subscribers.
Beginners encounter this process of creating a contact form as a significant challenge and tend to go with adding an email address directly. They don’t embed the Form, and yes, it will affect the professionalism and credibility of your WordPress business site.
Creating a professional contact form in a few minutes is not rocket science if you use the Divi theme for your WordPress site. What’s more? You may also customize these forms to make them unique to your site.
Before starting, let me tell you the advantages of integrating a well-designed form to reach your business contacts!
Disclosure: We get a commission when you buy a product via our affiliate link at no additional cost.
Table Of Contents
Benefits Of Having a Well-Designed Contact Form
Adding a well-designed contact form to your website can benefit you and your website visitors!
1. One of the primary benefits is that it makes it easy for visitors to contact you. Rather than searching for an email address or phone number, visitors can fill out the form and send their message directly to you. This approach boosts customer engagement.
2. Another benefit of a well-designed contact form is that it can help improve your website’s overall user experience. By providing a clear and easy-to-use form, visitors are more likely to have a positive experience on your site and may be more likely to return.
3. A good contact form can also help to reduce spam and unwanted messages. Ensuring that the messages you receive are legitimate and relevant by including features such as CAPTCHA or other anti-spam measures (as in the Divi theme).
4. A well-designed contact form can also provide valuable information about your visitors, such as their names, email addresses, and reasons for contacting you. This information can be used to understand your audience better and tailor your website or business to their needs.
Step-By-Step Guidelines To Create Divi Contact Form
The first step to creating a contact form on your WordPress site is to purchase the Divi theme. Once you have access to the full version of it, play with its wide range of features and page builder options.
Let’s begin adding a contact form in Divi theme. Follow us step-by-step to configure it like a PRO!
Step 1: Create a new page in your WordPress Dashboard account, and you may save it as a Contact page.
Click “Use Divi builder“; it will redirect you to Divi visual builder page.
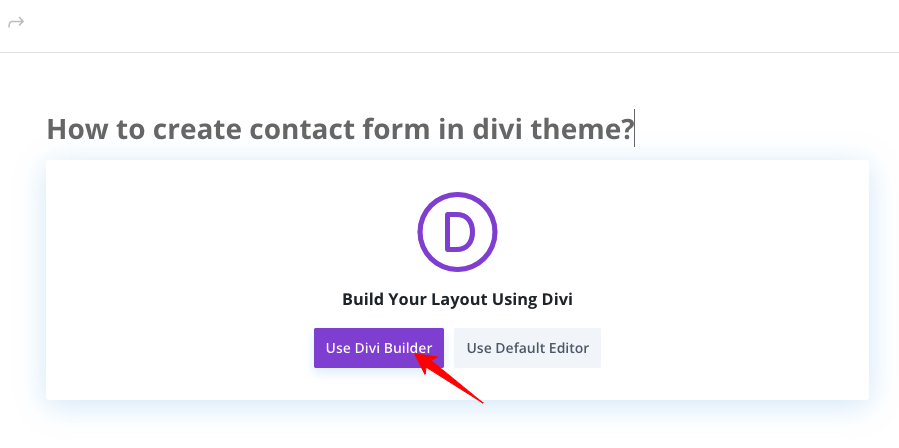
Step 2: Decide the look of your contact page. As you see a blank page of your contact form in Divi theme, click the “+” icon, which prompts you with three options – Build from scratch, use premade layouts, or clone an existing layout. Choose “build from scratch.”
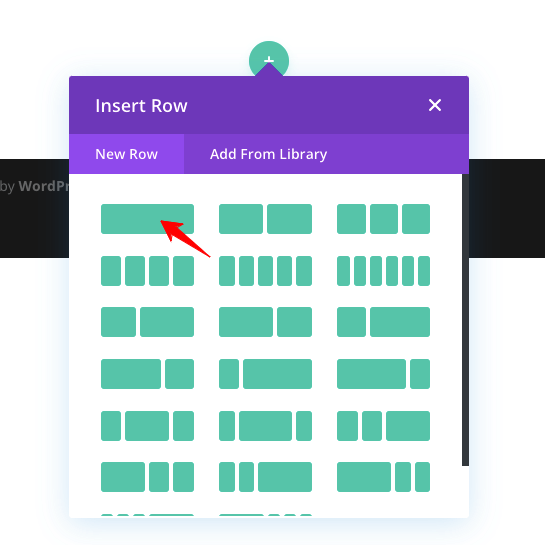
The immediate step is to choose the page layout (Form). As it asks you to insert a Row, click single row (You may select the structure as per your requirement). It will create a placeholder with only one row to customize and publish on your site.
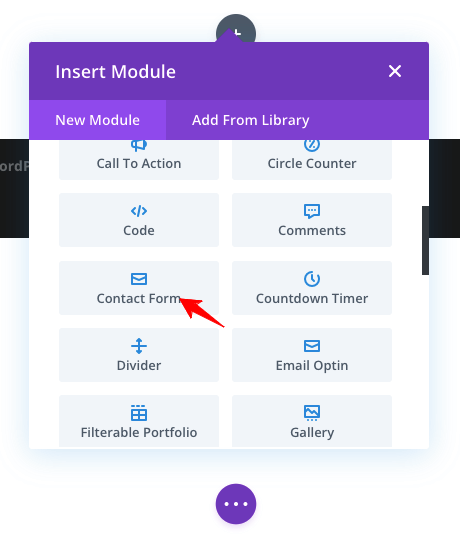
Step 3: You can insert a module by tapping on the row. Type Contact Form, and there’s a dedicated module in the Divi theme. Didn’t we tell you that the Divi theme has everything in it?
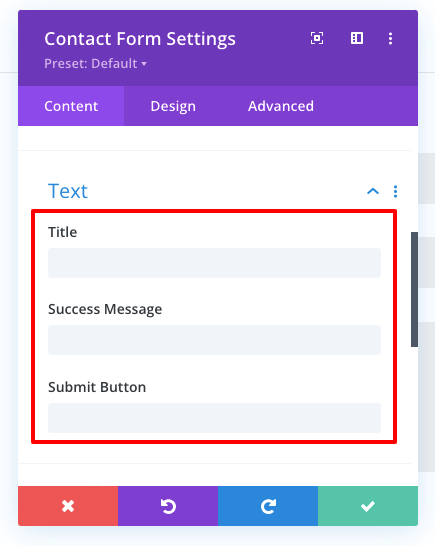
Step 4: The page is now updated with the default contact form as stored in the Divi theme, and it contains three fields: name, email, and message. Click on the Settings icon of the Form, and see the option to customize every form field, as in the below image.
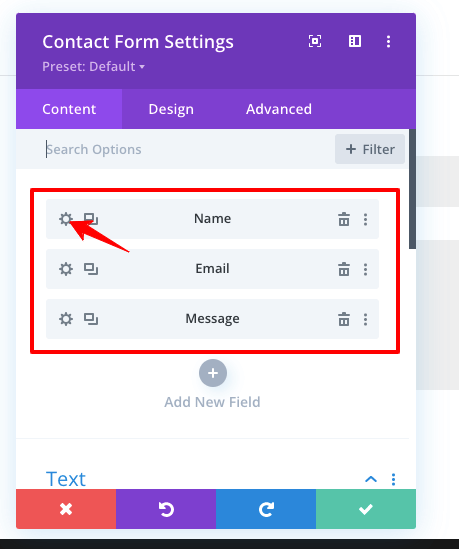
Begin customizing each field to set up your Divi contact form. Repeat until you are done.
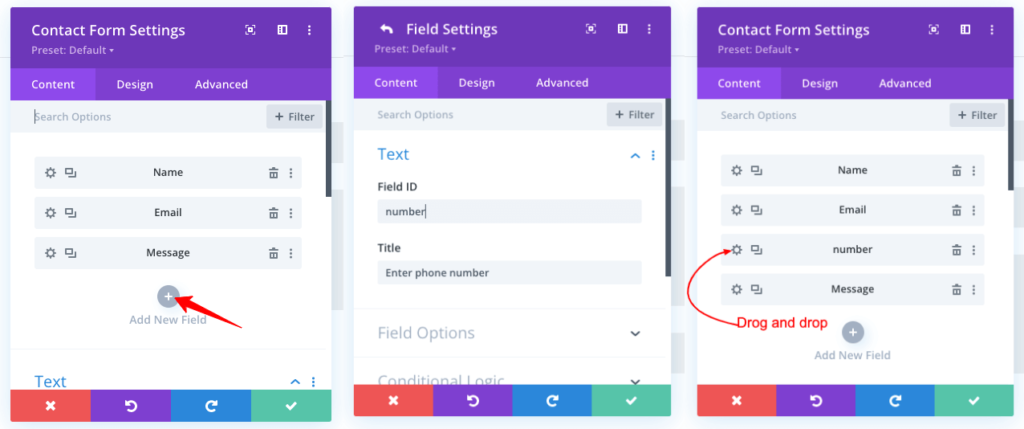
Step 5: If you want to add extra fields like phone numbers, click “Add New Field” (see the option in the above screenshot). Enter field information and then drag and drop the new field to ensure it sits right. For instance, you may want to ask for a phone number first and then move on to an email address. Drag the field accordingly.
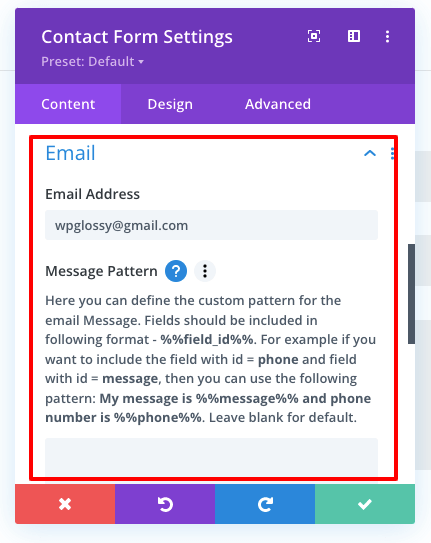
Step 6: Look at the settings dialog box of the contact form; there is also an option to configure your email address. Click the “Email” option and then type your email address.
Note: All details entered on the Form and submitted by the user will be sent to this email address.
Step 7: Once the email is configured, the next step is configuring the message sent notification. What should your Form display when someone has submitted some information? It can be as simple as “Your message is sent.”
Type the success message and then rename the submit button if required.
Step 8: When fields, emails, and confirmation messages are configured, it’s time to double-confirm if everything is correct. For this reason, look at the bottom area of the page and click Publish.
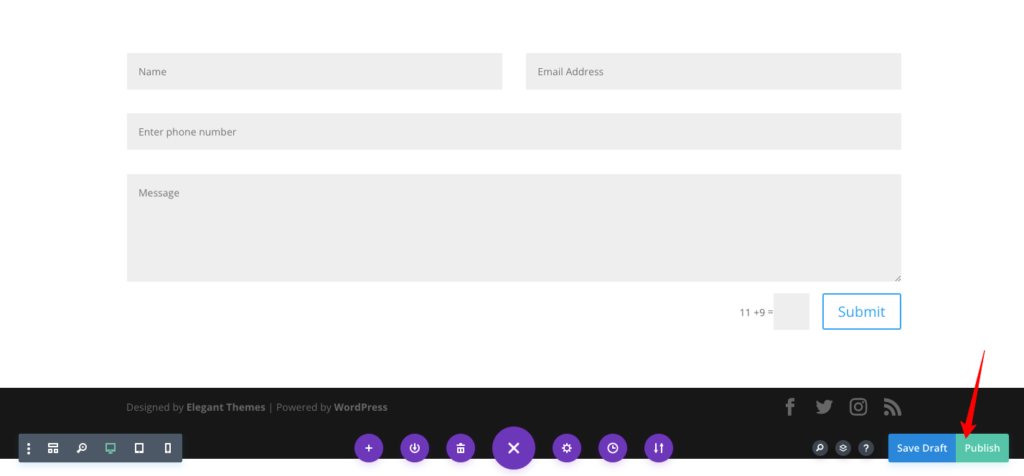
Now open the contact form on your site: websitename.com/contact. Ensure every field and functionality of the Form before you publish it to the web.
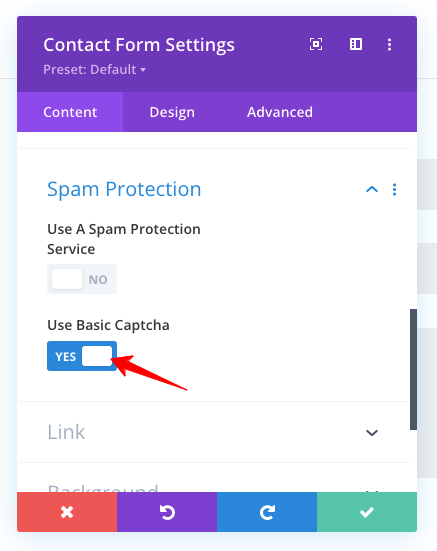
Bonus: Scroll down to the spam protection section in the Divi Contact Form settings. You may enable/disable the basic captcha on your communication form. Adding a captcha to your contact form in Divi theme reduces malware and spam entries. It’s recommended to turn it on!
Is everything clear? If you have any doubts about customizing the Divi Contact form, please get in touch with me anytime. I’ll help you fix things better so that you will make an eye-catching form.
Video Tutorial To Create Contact Form In Divi Theme
If you find it difficult to follow my guidelines to create contact form in Divi theme, watch the video tutorial I have done for your understanding.
Conclusion
The contact form is critical to each business site. Thanks to new algorithm updates from Google to enhance credibility and authenticity, site owners should prioritize setting up website contact forms.
If you are new to it, the Divi theme is what you should own to set a form almost instantly. You don’t need coding knowledge to design your communication form.
Perhaps, it is possible to modify the fields, improve the layout, and control spam entries when you use a contact form. Yet, this can help you to increase your leads and user engagement levels.
You have learned how to create a contact form in the Divi theme by using its settings options. Please get in touch with me through the comment section if you need any theme customization.