How to start a blog to make money is the trending question among people after the Covid 19 pandemic. No wonder! Most graduates, students, and homemakers like you want to earn from home genuinely!
Well! I have been blogging since 2008. Yes, it’s nearly 15 years! So, I can properly guide the people who ask, “How to start a successful blog for money.” I hope my experience will help you build a better blog through which a regular income can be made.
So, are you interested in knowing how to earn thousands of dollars from home through blogging? If yes, be ready because here I’ll guide you through creating a blog in simple steps, which is a hot topic worldwide. Yes, Building a money-making blog is not rocket science!
Creating a blog is a favorite topic and an honest of making income at home. According to the data, the number of bloggers in the United States has surpassed 31 million. So, what’s the thing that is so attractive about blogging?
The brief answer is “Passive income.” You could earn thousands of dollars or even more after creating a blog. You might be worried about how to start a blog in 2024 because the competition is high. But don’t worry; we can make it possible.
I’ll share a step-by-step guide to help you create the best blog to stand out from the crowd and make money at home. Also, at the end of the article, don’t miss to check some professional tips to create an identity and establish a brand name for yourself!
What Is A Blog?
Before we start with the procedure of starting a blog, you should understand: what’s a blog and how to get readers to it!
A blog is an online website where you may post several types of content. In simple words, it’s like your diary, and you may write anything you like! People from all around the world can read the content on your blog. However, how could they come to read it?
You should target the people who are interested in reading your content. That audience could be reached through Search Engine Optimization and Social Media Marketing. Once you start getting visitors to your articles, it will be easier for you to make money with them.
Step-By-Step Guide to Start a Blog
Now, without any delay, Let’s learn how to build a WordPress blog from scratch. Don’t worry! No need to bother about the technical steps involved. Anyone can do it without any problem.
1. Choose A Niche Carefully
The first step is choosing a suitable “Niche.” Please don’t confuse the word niche; it’s not a technical term but essential. Niche means a specific topic that you’ll post about. First, decide what you are going to write about. You should know about the topic you will cover, and hence, you could often update your site.
You could write about anything, whether it is about cooking, fashion, marketing, or even job interviews; it’s your decision. The only thing to ensure is that you provide value through the content. No matter how appealing the blog is, you’ll not be getting visitors if you fail to offer quality.
However, there’s one thing you should remember while choosing a niche. A blog would look better if you continuously write about a niche or two or three niches. So, choose a topic that interests you. Otherwise, you will lose interest in a few months.
If you’re an expert in fashion styling, make a fashion blog. If you’re an event organizer, start sharing tips and helpful content. Aside from professional interests, you may also pick a niche like pet, parenting, women’s, or men’s fashion. The niche can be anything, so ask yourself what is good for you.
2. Pick A Blogging Platform
The second step is to create a blog, but how can you do it quickly without coding? The simple answer is WordPress. Yes, other platforms like Wix, Weebly, Squarespace, etc. exist, but WordPress is the best content management system; even kids can understand its features.
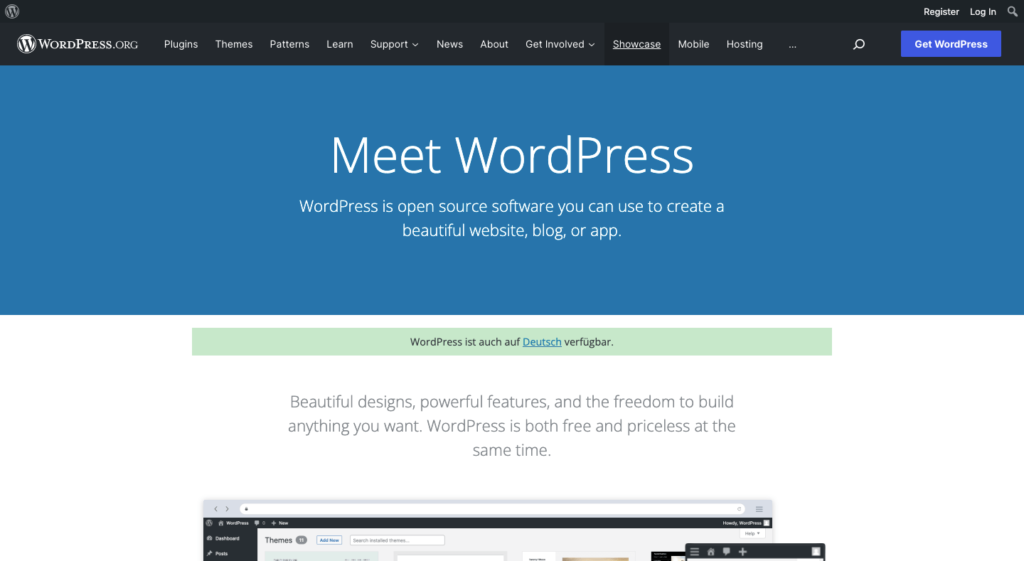
It allows you to create websites and blogs in a few hours. And the best thing is that you don’t need to learn the ABC of coding. You can create unlimited websites free of cost. Remember that free means is the software and its use. You need to pay for hosting and domain.
Furthermore, the functionalities of WordPress can be extended through themes and plugins. More than 60,000 plugins are available on WordPress, which can be downloaded and used easily. These plugins will make your work easy; that’s why I always suggest WordPress.
3. Choose A Domain Name
Domain name means the online name of your website. The domain name of this website is seen above on the browser search bar. Namecheap and GoDaddy are some famous domain providers. After paying the fee, search for the availability and get the domain name you want.
Tips to Choose Domain Name
- Make sure to choose a reliable domain name that represents the niche.
- Please go with the .com domain.
- Don’t use big phrases and numbers
- Pick a domain name that is short, easy to pronounce, and catchy.
Here’s an example of how a blog domain name is chosen.
If you live in Tokyo and create a Tokyo travel blog, the blog name could be “Tokyostory.com.” It is short, catchy, and easy to pronounce.
4. Buy A Good Hosting Plan
Choosing a good hosting plan is essential for a blog’s growth. There’s a reason why. Without a good hosting service, your website can’t survive. Web hosting provides security and storage spaces for the files (content, images, videos, etc.) you publish online.
It would be better to pick the best hosting service so your site will not go down due to the server’s technical faults. You may choose any hosting service that is fast and reliable; however, I always recommend the top-notch hosting service Cloudways.
Cloudways
Here are the reasons why you should buy Cloudways hosting.
- It is easy to set up.
- Offer good security.
- The uptime is good.
- Superfast servers to make your site load faster.
- Customer service is available 24/7.
- The package starts at $10 a month.
- You will get the chance to use a premium cloud server
Alternative Option – A2 Hosting

If you feel that it is an expensive hosting, there’s another option for you, “A2 Hosting”. It is an exceptional hosting service that has been around since 2001. A2 Hosting also offers good uptime, fast loading speed, security features, and different hosting plans.
Note: Choose the fastest hosting service with good uptime and customer support.
5. Setup Your Blog
Once you select the hosting service, it’s time to set up the blog. Below, I’ll share some easy steps to help you create a good website. So, make sure to read each step thoroughly.
Step One – Setup Hosting Account
Here are the steps to set up Cloudway’s hosting account.
Open the Cloudways official website and click on “Get Started Free.”
The next will be the sign-up page.
Here’s the point where you have to set up the account. In the first line, select WordPress and its version. Then, you have to name your website and server. (You may give any name to the website and server)
Select one between DigitalOcean, AWS, and Google Cloud. These are the high-performance Cloud servers.
You can see the line; it’s the part to select the server size. It’s up to you what size you want because the more you want, the more you’ve to pay.
The location part is crucial because you’re choosing the location of your server. So select the server nearest to the traffic. For instance, if you live in Asia but the blog traffic comes from Spain, choose the server closest to Spain.
After selecting everything, click – Launch Now.
On the next page, please wait until the server is set up. Once done, Go to the Application Menu above, and the next will be WordPress installation.
Now, click the WordPress Application. Afterward, all details of your WordPress panel will be visible. In the Admin Panel, you can copy WordPress’s username and password.
The last step is to click this link (https://login.wordpress.org/). Paste the username and password you’ve copied and log in to your account.
Step Two: Select the WordPress Theme
After logging in to your account, the WordPress dashboard will be accessible. Here you have the option to change everything about your blog. You can add plugins and themes and design the blog how you like.
On the dashboard, you’ll see different options like Dashboard, Posts, Media, Contact, Comments, etc. However, these are the backend settings, and now you only need a good and responsive theme.
Choose Appearance and then Theme. A whole page with different options will be open here. You can see the themes that are installed by default.
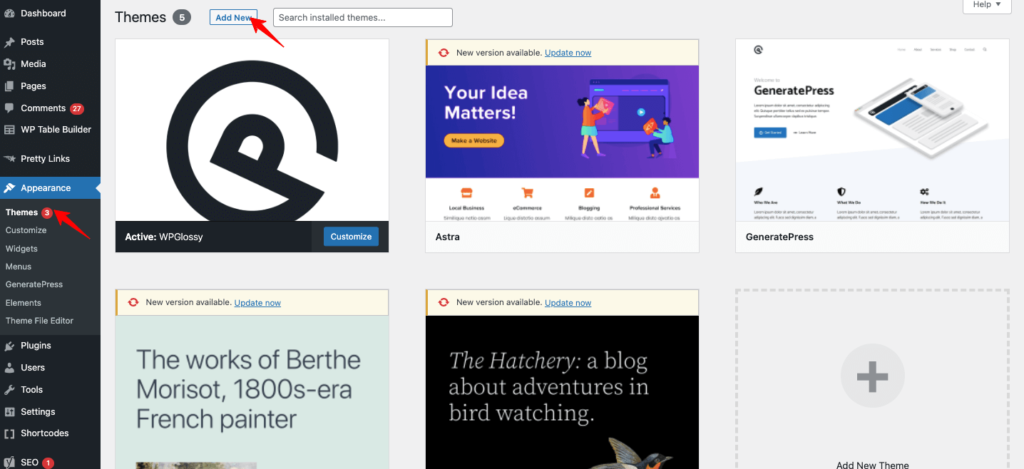
You can choose any theme you want or even go with the default theme; it’s your decision. Remember that despite your wish, it can backfire on you because most of the themes don’t work well. That’s why we want to recommend some fantastic themes.
5. Select A Responsive WordPress Theme
Many bloggers say Divi is the best theme as it has a responsive and appealing design that attracts the audience. Other than Divi, GeneratePress and WPAstra can also be used.
How to Download Divi Theme in WordPress?
- First, download the file of the Divi theme.
- Select Appearance, then Themes in the WordPress menu bar.
- Click Upload, and you’ll be redirected to a different page.
- You’ll see the option of “Upload the Theme.” So click it.
- And upload the Divi theme file.
- Later, wait a few minutes for the installation to complete, and hit – Activate.
You have the option to change the logo, Remove Sidebar, and Edit Footer in the Divi theme.
Step Three: Create Necessary Pages For A Blog
After installing the theme, your website can be designed according to your wish. But don’t forget to consider making these pages when you design your website.
- Create pages like “About Us” and “Contact Us.”
- About us – The page would be about who you are, your team, and your authors.
- Contact Us – page is where you’ll share the email social media links and add a form so your audience can contact you easily when they want.
- The disclaimer page is also important. It works as a notice. It states liability for the use of your website.
- A Privacy Policy Page is essential so the audience can understand what data you are collecting and how you are using it.
How To Create A Page On WordPress?
It’s time to understand how pages could be created in WordPress.
- Log in to WordPress’s admin panel by entering your username and password.
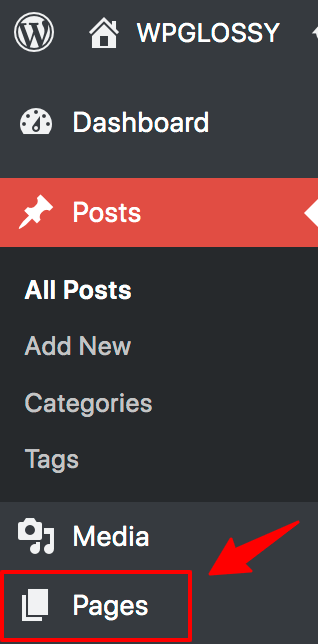
- Select Pages from the menu bar, and click on Add New.
- You’ll now see the WordPress page editor.
- On the page editor, you can add the title and content of the page.
- After writing the content, click on Publish.
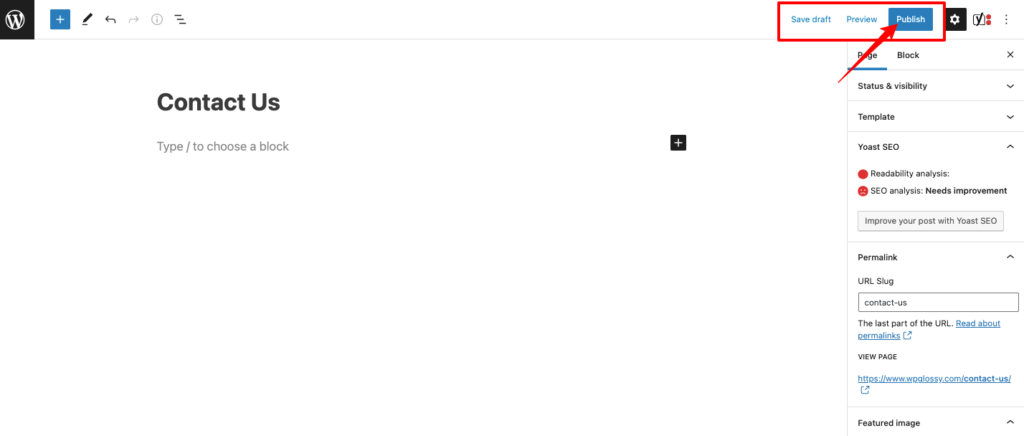
Note: If you don’t know the content, check other blogs to get an idea. Remember that you only have to get some ideas; copying content can become a severe problem.
Step Four: Install Useful Plugins
It would be good to use helpful plugins like Yoast SEO, Everest Forms, JetPack, Easy Social Sharing, etc. Each plugin has its benefits, Yoast is good for search engine optimization, while Everest Forms will help you create contact forms. Check this list of must-have WordPress plugins to install on your blog.
6. SEO Optimization
SEO is an important factor for search engine ranking; your blog can’t survive on the internet without it. You must optimize your web asset for a better user experience; don’t worry; the process is not too technical. Plus, I’ll only cover the necessary things for blog SEO optimization.
Create XML Sitemap
Google bots and other search engines crawl websites to index updated content. It’s an automated process, but by submitting sitemaps, you may make it easier for Google to index the up-to-date version of your site.
There are two ways to create sitemaps. The first one is a manual process that is difficult for beginners, and the second is through the Yoast SEO plugin. Here I’ll discuss this option since it is easy. So let’s start with the downloading process of the Yoast WordPress plugin.
To download the plugin, you need to click on the Plugins option. Then select Add new and download the Yoast SEO plugin. You must use the free or paid version; it’s your choice.
Sign up for the Yoast SEO account and activate the WordPress plugin. Later on, select the SEO option; it will be visible in the WordPress menu. Then, choose Features, scroll down to see the XML sitemaps option, and turn it on.
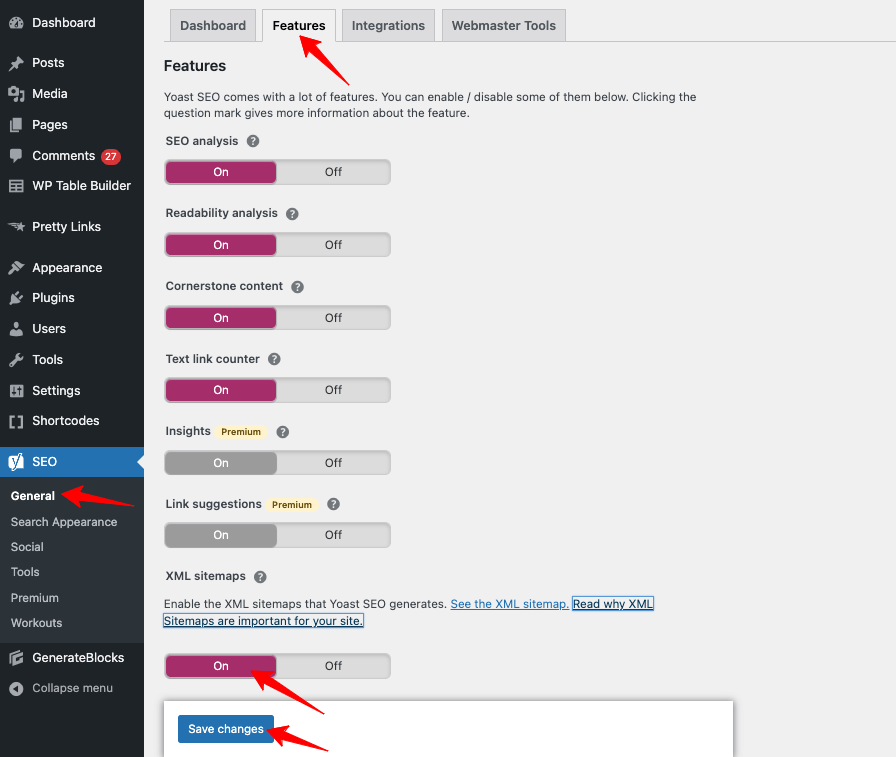
After this, click on the question mark symbol beside the XML sitemap name. And select “See the XML Sitemap” to see the sitemaps generated by the Yoast plugin.
Submit The Sitemap To Google Search Console
Google search console is a fantastic tool; with this, the blog’s overall performance could be checked. The good thing is it is free; there is no need to pay even a penny to anyone.
Here are the steps to create an account.
- Go to the Google Search Console website.
- Click the first option (search property).
- You’ll see the option Add property; select it.
- Choose the Domain option, enter your website URL, and continue.
- You can see the meta tag and copy option beside it in the next window.
- So select copy and paste the meta tag into another file.
- Log in to WordPress in a new tab, and don’t close the Google console page.
- Select SEO, the general, from the menu.
- The next window will be Yoast’s dashboard.
- Choose the option Webmaster tool.
- After choosing the webmaster tool, find the option name Google Verification Code.
- Paste the meta code beside the Google verification code.
- Click – save changes.
- Now, go back to the search console page and choose verify.
7. Plan For The Content
Congratulations, now you’re officially an owner of a blog, and you have done all the essential things for it!
Remember, your journey will start from here; the process I’ve shared above was just the trailer. From now on, you must give your best by providing quality content because that’s what the audience wants.
How Can You Write Quality Content?
Have you ever thought about why people would want to read blogs? The answer is that they look for answers and information. If you give them accurate answers and information engagingly with the help of images and videos, they’ll like it.
So always do in-depth research regarding the topic you’re writing and think about how to write content that will engage the audience. You should do keyword research to reach your targeted audience efficiently.
After writing content, make a schedule like how many articles you’ll post in a week. If you’re writing four blog posts, decide the days and stick to this schedule. Also, don’t forget to edit your old articles with the latest information, as it has several benefits.
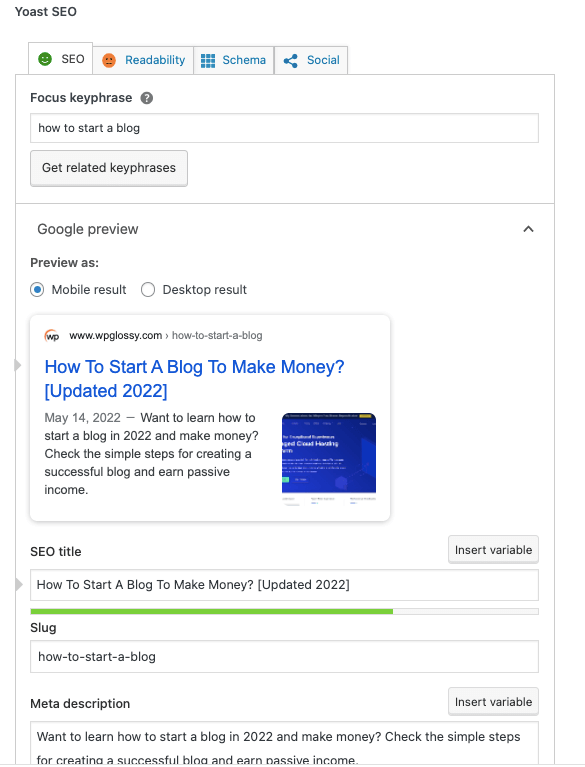
When it comes to SEO, learning about on-page SEO is essential. The Yoast SEO plugin will help you learn this skill. It is about placing the keywords, writing the Title & Meta description, and adding internal links & outbound links. You will be an on-page SEO expert when you start practicing doing it. Look at the SEO settings that you will get under every blog post!
8. Do Social Media Marketing
Lastly, you should now think about marketing your blog. Don’t overthink. It is not as difficult as it seems because you’ve social media. Therefore, create a Facebook page and create Instagram, LinkedIn, and Reddit profiles under the name of your blog.
Post content on the social media profile and gather loyal followers for the blog. After making the pages, add the profile links on the blog so your audience can reach out to you through social media. Share your valuable blog articles and nudge them to read & take action.
Pro Tips To Start A Blog
As a blogging expert, I would like to give you some professional tips on how to start a blog guide!
- Always prefer WordPress open-source CMS to handle the backend settings of your blog.
- Don’t go with the cheap hosting; you will not be getting a good server response time.
- Design your blog with a lightweight theme to avoid server load issues.
- The loading speed of your site is a Google ranking factor; try to pass core web vitals tests.
- Use the image optimization plugin to compress the images and serve them in next-gen format.
- Optimize your WordPress database for better performance.
- Implement the best on-page SEO for improved keyword rankings
- Keep tracking your targeted keywords and run site audits to get rid of technical errors, if any
- Keep the design and navigation simple to offer the best user experience.
- Provide maximum value through your content to earn loyal customers.
Last Words – How To Start A Blog & Make Passive Income
Congratulations, you’re just a few steps away from making passive income through the blog. You’ve to post content for at least five to six months. Then, you may try different monetization methods to earn consistent income.
If you don’t want to go with Adsense, you also have other options like Affiliate Marketing. Look at the best affiliate programs that offer recurring commissions. Besides, you must check some SEO affiliate programs, Pet affiliate programs, travel affiliate networks, and fashion affiliate programs to join the suitable ones related to your blog niche and make passive income every month.
If you write about logos and business branding, you must join a genuine program like the logo company affiliate program and make a regular income. So, it’s up to you which earning platform you prefer. You may also recommend products from Amazon stores and earn money for qualifying purchases.
I hope you’ve enjoyed my article “How to Start a Blog in 2024 and make a passive monthly income”. If you’ve any questions, please contact me through the comment section. I’ll help you build and run a successful blog through my knowledge and experience.

Thanks for providing core knowledge about, “how to start your own blog” Great Post!